How to Connect a Soundbar to TV


How to connect a soundbar to TV is the perfect question to ask when you realize your TV’s built-in speakers sound weak, and you need an upgrade. The connection process is straightforward once you know which method works for your setup.
Modern TVs and soundbars typically connect with a single HDMI cable, while older models use optical or RCA cables. This guide covers every connection method to get you cinema-quality sound in minutes.
Jump to:
What You Need Before Connecting Your Soundbar

Check the back panels of your TV and soundbar to identify available ports.
- Most TVs from 2009 onward include an HDMI port labeled ARC or eARC. This port handles both audio and video, which makes it the simplest option.
- If your TV lacks HDMI ARC, look for an optical audio port – a circular port with a protective flap labeled Digital Audio Out or Optical Out.
- Older TVs only have red and white RCA ports or a 3.5mm headphone jack. These analog connections work but deliver lower quality.
- Your soundbar has corresponding inputs: HDMI ports labeled “HDMI IN (ARC)” or “HDMI OUT (TV-ARC)” and optical inputs labeled “Digital Audio In” or “Optical In.”
Most soundbars include cables in the box, but verify you have the right cable for your chosen connection method.
If you still think your regular speaker can get the job done, check our full guide on soundbar vs speakers for PC gaming to see why soundbars always win if you want quick setup and a clean desk.
Method 1: Connect with HDMI ARC (Best Option)

HDMI ARC delivers the highest audio quality and simplest setup. This method lets you control soundbar volume with your TV remote. Here’s how the whole setup works:
- Find the HDMI port labeled “ARC” or “eARC” on your TV (usually port 2 or 3). Connect one end of your HDMI cable here.
- Locate the “HDMI OUT (TV-ARC)” port on your soundbar and connect the other end.
- Power on both devices. Your TV should automatically detect the soundbar and switch audio output.
Why HDMI ARC is best: It supports advanced audio formats like Dolby Atmos and DTS:X that optical can’t handle. Consumer Electronics Control means your TV remote controls soundbar volume automatically, and the soundbar powers down when you turn off the TV.
The newer eARC standard provides even higher bandwidth for lossless audio. If both devices support eARC, they’ll use it automatically with any HDMI cable.
Important: Use the ARC-labeled port, not regular HDMI ports. Regular ports can’t send audio back to your soundbar. Use a high-speed HDMI cable rated for HDMI 2.0 or higher. This is essential if you’re after a solid soundbar for music.
Method 2: Connect with Optical Cable
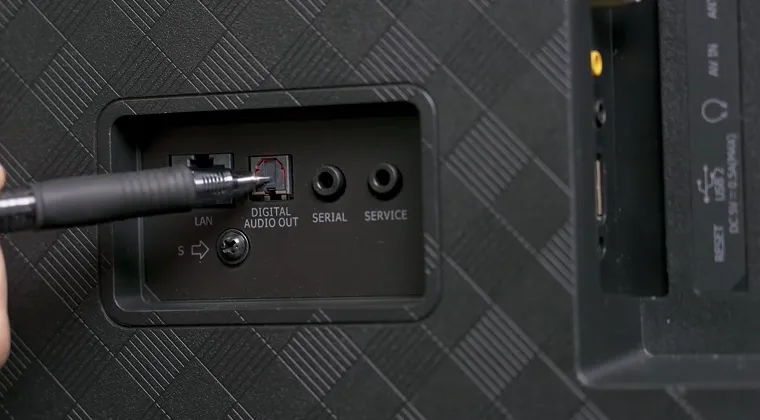
Optical cables provide digital audio without electrical interference, making them the second-best option when HDMI ARC isn’t available. Here’s the setup process:
- Find the optical port on your TV’s back panel – a small square or hexagonal port with a protective flap, labeled “Digital Audio Out.”
- Remove protective caps from both ends of the optical cable.
- Insert one end into your TV’s optical output port (it only fits one way).
- Connect the other end to your soundbar’s optical input labeled “Digital Audio In” or “Optical In.”
- Power on both devices and select the optical input on your soundbar by pressing “Source” until “D.IN” or “Optical” appears.
Limitations: Optical supports Dolby Digital 5.1 but can’t handle Dolby Atmos or DTS:X. You’ll need the soundbar’s remote for volume control since optical doesn’t support TV remote functionality. And if you want a hard bass, you’ll find all you need in our guide on best soundbars with subwoofers.
Method 3: Connect via Bluetooth (Wireless Option)
Bluetooth eliminates cables but introduces audio delay that causes lip-sync issues. If that’s not a concern, here’s how to do it:
- Enable pairing mode on your soundbar by pressing and holding the Bluetooth button until you see a flashing light or “BT Pairing” on the display.
- Access your TV’s Bluetooth settings (Settings > Sound > Sound Output > Bluetooth Speaker List on Samsung, Settings > Sound > Sound Out > Use Wireless Speaker on LG).
- Select your soundbar from the available devices list.
Drawbacks: Expect 30-150 milliseconds of audio lag. Many TVs auto-compensate for latency, but synchronization isn’t perfect. Compressed audio quality is noticeably lower than wired connections.
Best use: Temporary setups with good budget soundbars or when cables aren’t practical. Fine for news and documentaries where perfect sync isn’t critical. I use HDMI ARC primarily and keep Bluetooth as backup.
Method 4: Connect with RCA or AUX Cable (Older TVs)
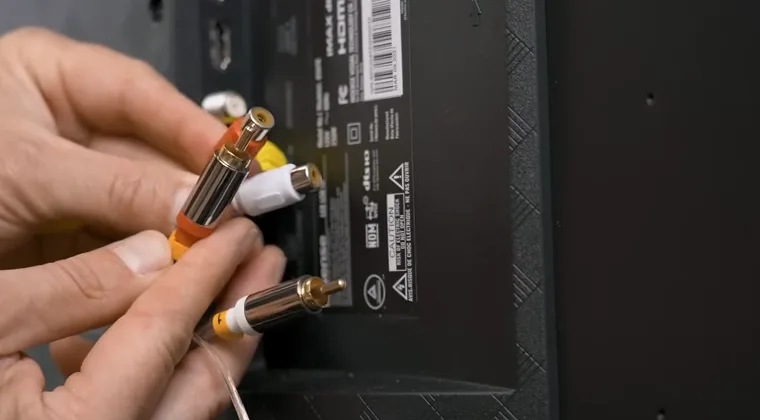
Older TVs without digital outputs use analog RCA cables (red and white) or 3.5mm auxiliary connections. The setup is simple:
- Connect red to red and white to white ports on both devices. For AUX, plug the 3.5mm cable into your TV’s headphone jack and soundbar’s “AUX IN” port.
- Select the appropriate input on your soundbar (usually “AUX” or “Analog”).
Limitations: Stereo sound only, no surround formats. Audio quality is noticeably lower. Use decent cables to avoid buzzing or static. If you’re looking at that amazing Bose Soundbar, I also recommend pairing it with a modern TV for cinema-quality sound.
Changing Your TV’s Audio Settings
After connecting cables, configure your TV to send audio to the soundbar by accessing Settings and finding Sound or Audio Settings.
Different brands label audio output differently:
- Samsung: Sound > Sound Output > Select soundbar
- LG: Sound > Sound Out > External Speaker
- Sony: Display & Sound > Audio Output > Audio System
- Vizio: Audio > Speakers > External Speakers
For HDMI ARC, choose Receiver (HDMI) or Audio System. For optical, select Optical or Digital Out. Set digital audio format to Bitstream or Auto for surround sound.
HDMI-CEC: Enable this feature (Anynet+ on Samsung, SimpLink on LG, Bravia Sync on Sony) for TV remote control of soundbar volume.
Troubleshooting Common Problems
Here a few common issues you might face when setting up your soundbar:
- No sound: Verify the correct input is selected on your soundbar and TV audio output is set to external speakers. For optical, remove protective caps from both cable ends.
- Audio/video out of sync: Adjust audio delay settings (labeled “Audio Sync,” “Lip Sync,” or “A/V Sync”) on your TV or soundbar. Most devices allow 0-300 milliseconds adjustment. Start at zero and adjust until dialogue matches lip movements.
- HDMI ARC not working: Confirm both devices support ARC (check for “ARC” labels). Enable HDMI-CEC in TV settings. Power cycle both devices by unplugging for 30 seconds.
- Poor Bluetooth: Move soundbar closer to TV. Remove obstacles between devices. Turn off other Bluetooth devices. Re-pair by deleting the connection and starting fresh.
Which Connection Should You Choose?
Your choice here basically depends on your TV. This is not the scenario where we say, so you’ve got a great gaming soundbar, pick X. HDMI ARC is always best, and you think about other options if your TV doesn’t support it. With that in mind, here’s the full overview:
- Use HDMI ARC if both devices have ARC ports. Best quality, advanced format support, one-remote control.
- Use optical cable if either device lacks HDMI ARC. Excellent quality for most content, requires a separate remote.
- Use Bluetooth only for temporary setups. Expect audio delay and lower quality.
- Use RCA/AUX only if no digital outputs exist. Acceptable for basic viewing but limited quality.
I use HDMI ARC for convenience and advanced audio format support. Testing showed no noticeable quality difference versus optical for standard content, but HDMI ARC handles 4K Blu-ray formats optical can’t support.
Ready to Upgrade Your Entertainment Setup?
Connecting your soundbar to your TV takes just a few minutes once you identify which ports both devices have.
HDMI ARC delivers the best experience with single-cable setup and TV remote control, but optical connections work great when ARC isn’t available. Even older analog connections dramatically improve audio compared to TV speakers.
The transformation in audio quality makes movies, gaming, and streaming far more immersive. Explosions actually rumble, dialogue comes through crystal clear, and subtle sound effects you never noticed before suddenly enhance every scene. I’ve helped friends set up dozens of soundbars, and the reaction is always the same – they can’t believe what they were missing with basic TV speakers.
When you’ve got everything set up, pick up an affordable game or two from our Marketplace and experience gaming immersion like never before.
FAQs
Yes, most soundbars include multiple HDMI inputs for connecting game consoles, Blu-ray players, or streaming devices directly to the soundbar. The soundbar then passes video to your TV while processing audio internally. This setup often provides better sound quality than connecting devices directly to your TV.
No, any high-speed HDMI cable rated for HDMI 1.4 or higher supports ARC functionality. For eARC, use an HDMI 2.1 cable to ensure full bandwidth support for advanced audio formats. The cables included with most soundbars work fine for ARC connections.
Check your TV’s audio format setting. If it’s set to “PCM,” your soundbar only receives stereo audio even if the source content is surround sound. Change this setting to “Bitstream” or “Auto” to pass through the full audio signal to your soundbar.
Yes, but only with HDMI ARC connections that have HDMI-CEC enabled.Activate this feature in your TV settings (called Anynet+, SimpLink, or Bravia Sync depending on the brand). Optical, Bluetooth, and analog connections require using the soundbar’s remote for volume control.
Access the audio sync or lip sync settings on either your TV or soundbar. Adjust the delay value in small increments until dialogue matches on-screen lip movements. Most devices allow 0-300 milliseconds of adjustment. Try adjusting on the soundbar first, then the TV if needed.