7 Days to Die Tips You Must Know to Survive, Build, and Thrive

Survival games are my comfort food when I need to unwind. 7 Days to Die scratches that itch and then some. This brutal blend of first‑person shooter, survival horror, and open‑world crafting drops you into a post‑apocalyptic wasteland with one goal: stay alive. It sounds simple until the clock ticks down toward the first Blood Moon and you realize how ill‑prepared you are. After putting countless hours into this game, I want to share 7 Days to Die tips that can help new players avoid rookie mistakes. I’ll walk you through the basics, explain how skill points work, break down combat and base building, and share late‑game strategies. Think of this as a friendly guide from a fellow “survivor”.
Jump to:
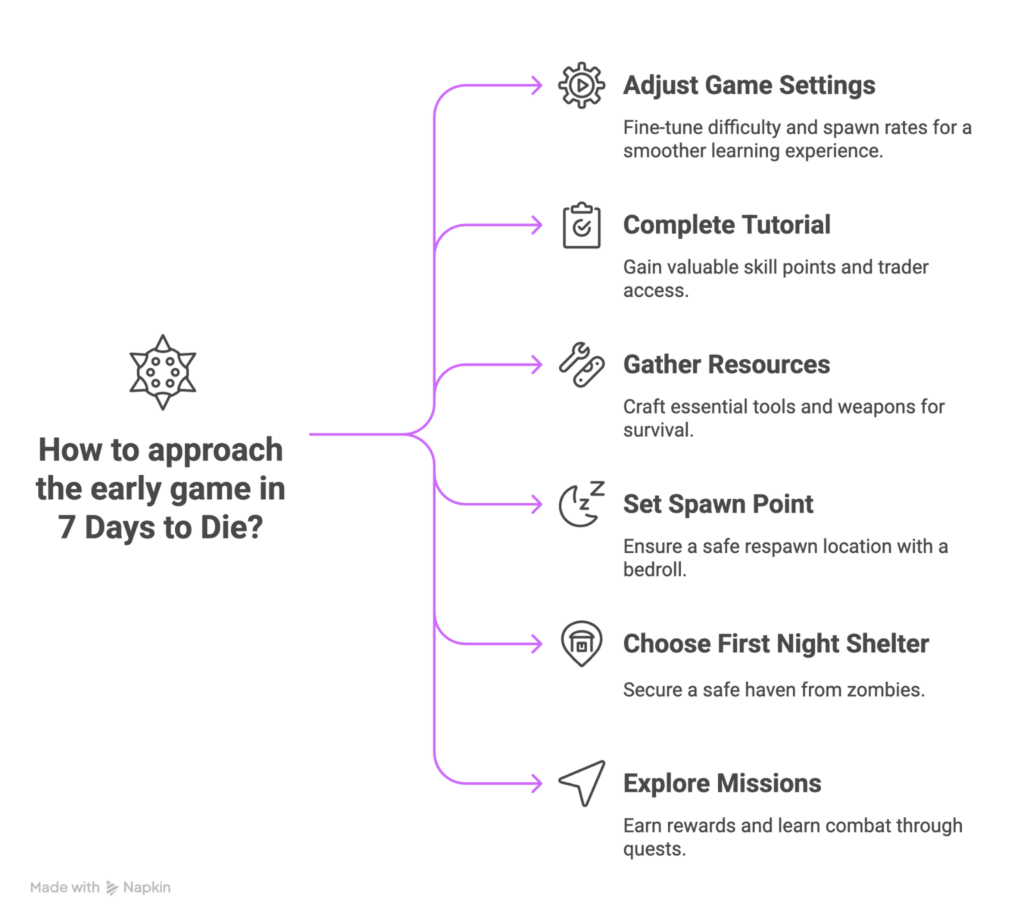
7 Days to Die Tips for the Early Game
The first seven days set the tone for your entire run. This section covers everything you should do before the first horde shows up.
1 – Adjust Your Game Settings
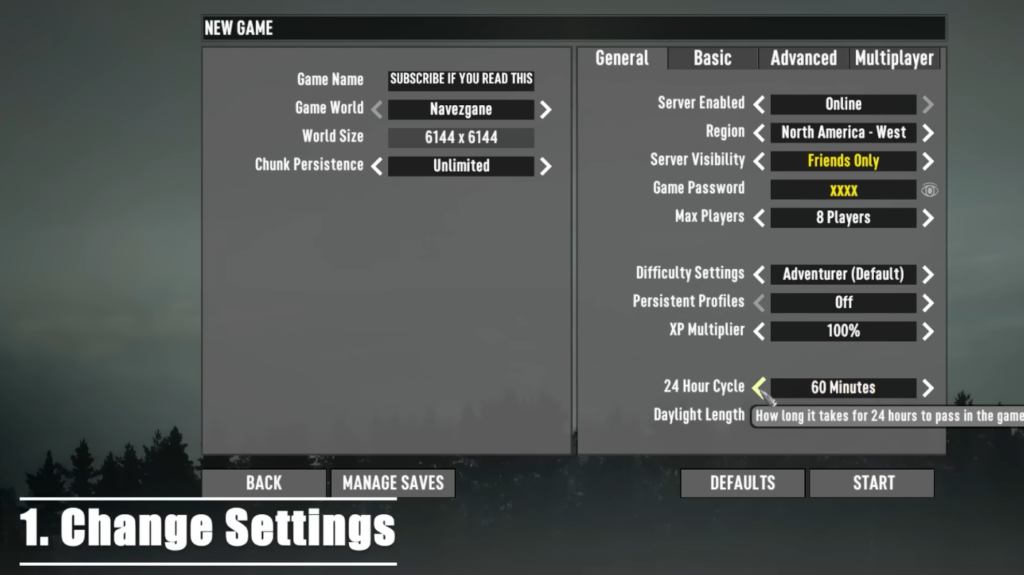
When I started playing, I left everything on default and regretted it. You can fine‑tune the difficulty, XP multiplier, zombie spawn rate, and day length in the game settings. If you’re just learning, set the difficulty to Adventurer or Nomad, reduce enemy spawn to avoid large groups, and lengthen the daylight hours. It takes the pressure off while you learn the ropes. Later, you can increase the challenge for more tension.
2 – Complete the Tutorial Challenges
After spawning, you’ll notice a series of on‑screen objectives: craft a bedroll, gather plant fibers, craft a stone axe, place your bedroll, and build a campfire. Finishing these tasks rewards you with four free skill points and reveals the nearest trader location. That trader becomes a lifeline, offering missions, supplies, and a safe zone during horde nights. Don’t skip this quick tutorial; those early points are too valuable.
3 – Gather Essential Resources
Your first minutes should be spent punching grass, picking up small stones, and chopping down trees. With just wood, stone, and plant fibers, you can craft a stone axe,a primitive bow, stone arrows, and a wooden club. A bow allows you to kill zombies from a distance, while a club is useful when arrows are scarce. Keep at least thirty arrows in your inventory and remember you can retrieve arrows from fallen zombies. This conserves resources and makes early combat easier.
4 – Craft a Bedroll and Set Your Spawn
A bedroll marks your respawn point, which is vital because death drops you somewhere random on the map. Use ten plant fibers to craft a bedroll and place it somewhere safe. If you move on, pick it up, and place it again so you always have a nearby respawn point.
5 – Decide Where to Spend Your First Night
You can build a basic shelter using wood frames, but I often take over an existing building to save materials. Look for a cabin or small house near your spawn and board up the windows with wooden frames. Use a secure wood door to block entry and place a few wooden spikes outside to slow down zombies. Avoid large towns early on because zombie spawns are higher. If you prefer to explore, craft blocks, and build a tower two blocks high, zombies can’t jump up, and you can safely fire arrows down.
6 – Explore Mission Locations
Once you meet the trader, accept the simple fetch or clear missions he offers. These quests send you to nearby points of interest and reward you with dukes (the in‑game currency), experience, and sometimes weapons or magazines. Missions are also a safe way to learn combat and exploration since POIs reset after completion, allowing you to loot twice.
During this early phase, don’t worry about perfect base construction or advanced weapons. Focus on gathering relevant resources, finishing the tutorial, and earning your first skill points.
If you’d like inspiration from other survival games with tight early‑game pressure, check out our feature on the best PS5 survival games, where 7 Days to Die and The Forest both shine for their tension and crafting depth.
Spending Skill Points Wisely: Building Your Character
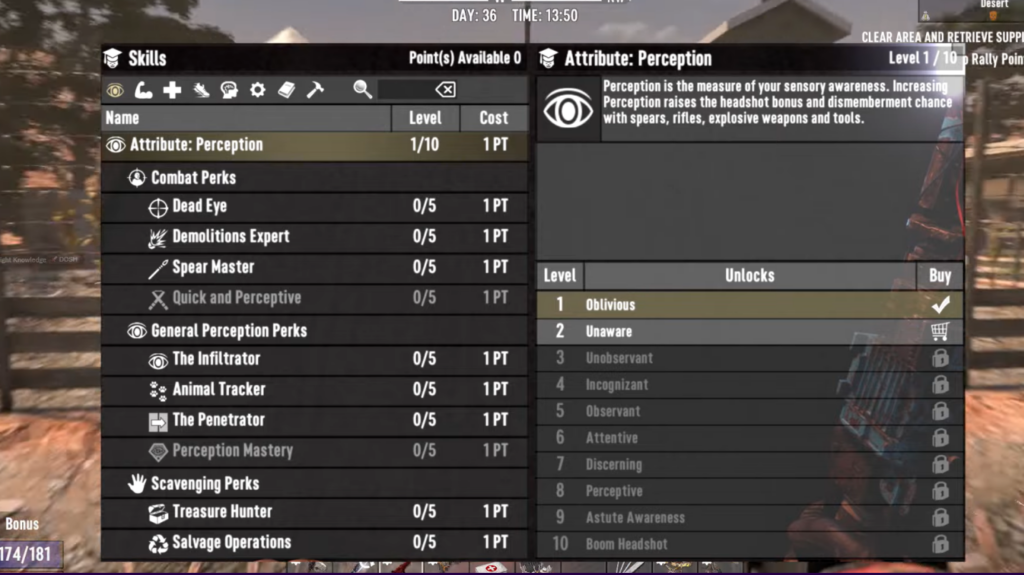
Your character’s progression depends on how you allocate skill points. There are five main attributes (Strength, Fortitude, Agility, Perception, and Intellect), each with branching perks. Understanding what each attribute does makes it easier to spend points effectively.
Strength improves melee damage, carry capacity, and mining efficiency. Early on, I usually invest a point in Pack Mule to unlock extra inventory slots, which reduces the slow movement penalty from encumbrance. Sexy Tyrannosaurus reduces stamina cost on melee attacks and harvesting, which makes chopping trees and swinging clubs less tiring. Miner 69er increases block damage and tool durability, speeding up resource gathering.
Fortitude relates to survivability and farming. Putting points into Rule 1: Cardio increases your stamina regeneration while sprinting, which is invaluable when outrunning zombies. Living Off The Land lets you harvest more crops from farm plots and craft more seeds, and Iron Gut reduces food and water loss. If you plan to farm or often find yourself running out of stamina, Fortitude perks are great early investments.
Agility boosts stealth, movement speed, and ranged attacks with bows and pistols. The Flurry of Blows perk increases attack speed with bladed weapons, while Parkour prevents sprained or broken legs when jumping from greater heights and allows you to jump higher. I love investing here because it keeps my character nimble, and combined with a primitive bow, it makes early encounters safer.
Perception governs loot quality and damage with rifles, spears, and explosives. Lucky Looter increases loot quantity and improves the quality of your finds, which makes each supply run more rewarding. Javelin Master boosts spear damage and throw distance. Since I often rely on spears and prefer high‑value loot early on, one or two points here make a noticeable difference.
Intellect is the crafting and technology tree. Advanced Engineering allows you to craft workbenches and forges sooner, Grease Monkey unlocks vehicles like the bicycle and minibike, and Master Chef lets you cook more nutritious meals. Investing here can feel slower at first because the perks don’t directly increase damage, but you’ll appreciate them when you start crafting firearms and vehicles. I usually spend a point in Master Chef after I’ve covered stamina and damage perks because grilled meat and bacon, and eggs restore more hunger and don’t cause dysentery.
Skill points can also be earned from magazines and books found in mailboxes, newspaper stands, bookshelves, and traders. These reading materials often provide one‑time perks or incremental benefits. For example, completing a full set from the Archery series may grant damage bonuses or the ability to retrieve more arrows. Remember not to re‑read books you already know; trade them for dukes or share them with friends.
Balance is the KEY.
Spread your points across survival, combat, and crafting. Don’t sink every point into one tree right away. New players sometimes overinvest in damage and neglect stamina or inventory space, only to realize later that they can’t carry loot or outrun enemies. Plan your build based on your preferred playstyle; a melee brawler will lean toward Strength and Fortitude, while a stealth archer may choose Agility and Perception.
For fans of survival sandboxes with deep progression systems, our piece on games like Rust explores titles where skill investment significantly changes your experience. Understanding how other games handle progression can inspire new ways to build your survivor in 7 Days to Die.
Combat Essentials and Weapon Strategies
Combat in 7 Days to Die is more than swinging a club. Knowing when to fight, when to flee, and how to use your weapons is more important. Here’s how I handle different situations.
Use the Right Weapon for the Situation
In the early game, the primitive bow and stone spear form a reliable combo. Bows allow you to pick off slow zombies from a distance. Aim for the head to maximize damage and save arrows. Spears offer reach and can knock enemies down with a power attack. Hitting headshots with the spear’s throw can stagger zombies, buying you time to switch to another weapon or retreat. Wooden clubs are adequate in tight quarters but require you to get closer.
Manage Stamina
Running, swinging, and jumping drain stamina quickly, especially before you upgrade stamina perks. Avoid spamming heavy attacks; instead, time your strikes and back away after connecting. Investing in Sexy Tyrannosaurus and carrying boiled meat helps maintain stamina during prolonged fights.
Control Engagements
Fighting a single zombie is manageable, but multiple zombies can stun and overwhelm you. When dealing with several enemies, create distance by using frame shapes or wooden blocks. Place two or three blocks in a column, jump on top, and attack from above. Zombies can’t climb two blocks high, so this trick saves your life when surrounded. Doors, hatches, and ladders can also create choke points. If you have time to prepare before a horde, place hatches in front of a doorway and open them upward to create barriers you can swing through.
Stay Stealthy When Needed
Crouching reduces noise and visibility; a small eye icon indicates how visible you are to zombies. Sneak attacks with bows or knives do extra damage. In the daytime, I often crouch and snipe zombies one by one to avoid attracting a crowd. At night, stealth becomes essential because most zombies sprint and can quickly overwhelm you if they notice you.
Introduce Firearms Carefully
Guns change everything by killing zombies faster, but they’re loud. Firing a pistol, shotgun, or rifle attracts nearby undead and raises the heat level in your area, which can spawn screamers. Use firearms when your life depends on it or when facing feral zombies with glowing eyes that run during the day. In early game, the blunderbuss and pipe weapons are crude but effective. Later, shotguns dominate close combat while assault rifles and sniper rifles handle mid‑ to long‑range threats. Always carry a backup melee weapon; ammo is scarce and reloading takes time.
Prepare Your Hot Bar
Keep essential items on your hot bar: a melee weapon, a ranged weapon, building blocks, bandages or first aid kits, repair kits, and torches. Being able to quickly place a block or heal mid‑fight can mean the difference between life and death. Don’t waste space on heavy, seldom‑used items; stash them in your storage.
| Above all, remember that you don’t have to fight every zombie. Stealth and avoidance are legitimate strategies. If you are exploring a city and see glowing eyes in the distance, back off and come back when you’re better equipped. |
When you need a break from the intense combat of 7 Days to Die and want to explore other undead challenges, our rundown of the best zombie games on Xbox showcases titles like State of Decay 2 and World War Z. Seeing how those games handle hordes and combat tactics can inspire new approaches in your own horde fights.
Base Building and Surviving Horde Nights
Building a secure base is at the heart of 7 Days to Die. You can take over an existing structure or start from scratch, but some general principles apply to any home.
Location Matters
Staying close to a trader saves travel time and offers quick mission turn‑ins, but avoid setting up right next to one because traders close at night and teleport you outside. I often pick a flat area near a water source with a few trees and boulders nearby for easy resource gathering. Avoid building in towns early on; zombie density is higher, and it’s easier to get trapped.
Take Over or Build
If you find a suitable house with reinforced walls and a ladder to a rooftop, fortify it for the first couple of nights. Board up windows, repair damaged blocks, and set down wooden spikes outside. This saves time. However, prebuilt structures are weaker long-term. As soon as possible, craft wood and cobblestone shapes to design a custom horde base separate from your main shelter. Having separate bases protects your loot; if your horde base fails, at least your storage remains intact.
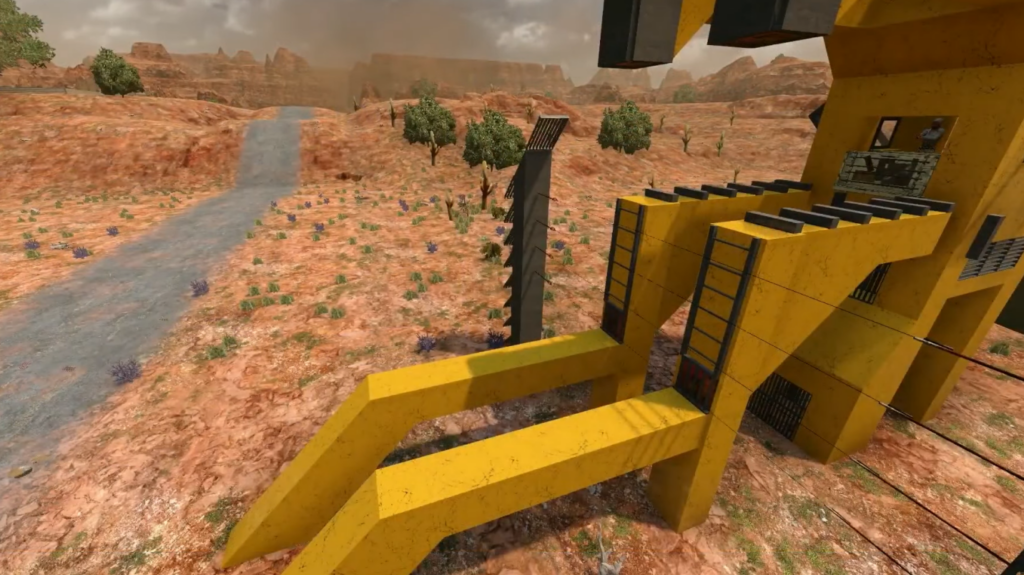
Design a Horde Base
Zombies follow the path of least resistance. Build a walkway with ramps leading to a single choke point where you can attack. Wooden or iron bars let you shoot or swing through while blocking zombies. Spikes, barbed wire, electric fences, and blade traps slow or damage them, but even simple wooden spikes can be effective early on. Upgrade wooden blocks to cobblestone and then concrete using a hammer or nail gun. Always provide a clear path; if zombies can’t reach you, they’ll start breaking random walls. Reinforce support pillars to prevent your structure from collapsing when they dig.
Manage Heat
Campfires, forges, and chemistry stations generate heat, attracting screamers (special zombies that scream and spawn a mini‑horde). Keep these crafting stations away from your living area or turn them off when not in use. In the early game, use a cooking pot on a campfire outside and craft dew collectors to collect clean water without boiling murky water each time. In the late game, craft a water purifier mod for your helmet so you can drink murky water directly.
Prepare for the Blood Moon
Every seventh day, the sky turns red and a horde of zombies comes to destroy you. Before sundown, ensure your weapons are repaired, your ammo loaded, and your base fortified. Lay down extra spikes, repair damaged blocks, and ensure your exit route is clear. I always bring multiple weapons, extra frames, medical supplies, and some coffee or energy drinks for stamina. During the fight, stay calm, prioritize headshots, and repair blocks between waves. If a wall breaks, retreat to a fallback point. After the night ends, collect loot bags and repair the damage.
| Having a solid base design lets you experiment with creative defenses. If you’d like to see how other zombie titles handle fortifications and co‑op defence, explore our article on the best zombie games for comparisons. Many games, including Dead Island 2 and World War Z, use similar trap mechanics that can inspire your own horde base. |
Crafting, Farming, and Late‑Game Resources

Once you survive a few Blood Moons, the game shifts from pure survival to long‑term planning. Crafting advanced equipment, establishing a food supply, and exploring the map become priorities.
Master the Crafting Menu
Pressing Tab opens the crafting menu, which lists recipes for tools, weapons, armor, consumables, and building materials. As you unlock perks in Advanced Engineering or find schematic books, you’ll be able to craft workbenches, forges, and chemistry stations. A forge allows you to smelt raw iron and clay into forged iron and steel, necessary for better tools and weapons. A workbench lets you craft more complex items, including vehicles. The chemistry station speeds up crafting of gunpowder, first aid kits, and other advanced items.
Gather Late‑Game Resources
Mining becomes important once your basic needs are met. Look for gravel patches or ore nodes on the surface to locate veins of iron, lead, coal, nitrate powder, and oil shale. Iron and clay make forged iron; lead, nitrate powder, and coal combine to craft bullets; and oil shale refined in a chem station makes gas for vehicles. Salvage operations on cars, vending machines, and air conditioners yield springs, mechanical parts, and electrical parts. Invest in the Salvage Operations perk (under Perception) to increase the quantity of parts you get.
Establish Farms and Livestock
Food scarcity eases once you start farming. Create farm plots using clay, nitrate powder, and rotten flesh. Plant crops like corn, potatoes, blueberries, and pumpkins. The Living Off The Land perk increases harvest yield and lets you craft seeds without destroying the parent plant. Hunting remains valuable; deer, pigs, and chickens provide meat, bones, and leather. Use a bone knife or machete for harvesting animals to get more resources than with an axe. Meat can be cooked into bacon and eggs or grilled meat, which provide solid health and stamina boosts without risk of dysentery.
Water Management
Collect murky water in empty jars from rivers, lakes, toilets, and swimming pools. Boil it on a campfire with a cooking pot to produce clean water. Dew collectors provide a passive source of clean water over time; I built several and placed them on my base’s roof. Late‑game helmets can be modded with water purifiers, which allow you to drink murky water without getting sick.
Vehicles Make Travel Easier
Unlocking vehicles revolutionizes exploration. The bicycle is an early option once you put points into Grease Monkey. It requires few materials but has no storage and is tiring to ride uphill. The minibike adds storage and uses gasoline, while the motorcycle and 4×4 truck offer more speed and capacity. The gyrocopter allows flying over mountains and cities but is expensive and tricky to control. Having at least a minibike saves hours of walking and gives you a mobile storage chest. Don’t forget to craft repair kits to maintain vehicles and keep an eye on gas reserves.
Upgrade Your Arsenal
Mid‑ to late‑game loot introduces shotguns, assault rifles, submachine guns, sniper rifles, and robotic turrets. Mods like barrel extenders, drum magazines, and reflex sights enhance performance. Electric fences and blade traps become more viable as you collect electrical parts and motors. Robotics inventor perks let you deploy autonomous turrets and robotic sledges that knock zombies back. These tools amplify your defences but require careful placement and a stable power supply, usually from engines or batteries connected via wires to a generator.
Organize Your Storage
Encumbrance slows you down, so keep your base tidy. Craft secure storage chests and label them, for example, “Food,” “Weapons,” “Ammo,” “Building Materials,” and “Medical.” Clothing pocket mods and larger backpacks (unlocked via mods or skills) increase inventory space. Staying organized reduces wasted time sorting through clutter when the horde siren blares.
By this stage, you’ll feel more like a seasoned survivor than a rookie. You might even join friends online to build shared bases or tackle massive horde nights together. If you’re interested in other cooperative survival experiences, our article on the best survival games includes cooperative titles that test teamwork and base defence in different ways.
Surviving and Thriving
After spending dozens of in‑game weeks fending off undead hordes, I’ve realized that 7 Days to Die rewards patience, planning, and creativity. The early days focus on learning the controls, gathering basic supplies, and squeezing value out of every skill point. As you progress, you’ll face tougher zombies and must adapt your tactics with better weapons, stronger walls, and clever traps. Spending time on farming and resource gathering frees you from constant hunger and thirst, while vehicles open the world for exploration.
I’ve fallen in love with the loop of scavenging by day, building by night, and holding the line during the Blood Moon. Every update adds new content and improves the zombie AI, keeping the game fresh. If you’re playing solo or with friends, these 7 Days to Die tips should help you survive those first brutal nights and carry you into the late game.
When you’re ready to jump into the world of Navezgane or gift the experience to a friend, you can get your 7 Days to Die console edition on our marketplace and join our community of survivors. We constantly update our offers, and this key unlocks the full game so you can put these tips into practice.
FAQs
How do you spend skill points in 7 Days to Die?
To spend skill points in 7 Days to Die, open the Character window (default key B), click on the attributes across the top, and select the perk you want. Each perk shows its requirements and cost. After investing, confirm the purchase. Allocate points gradually and focus on perks that support your playstyle, such as stamina, inventory, or damage.
What is the best weapon in 7 Days to Die?
The best weapon in 7 Days to Die depends on the situation; shotguns excel in close quarters while rifles rule at long range. For early game, the primitive bow or pipe rifle is effective because ammunition is cheap. Later, pump‑action shotguns and AK‑47s provide high damage and crowd control.
How do you survive the first night in 7 Days to Die?
To survive the first night in 7 Days to Die, fortify an existing house or build a small shelter with wood frames, place your bedroll, and avoid making noise. Craft a campfire for warmth and light, but keep activity low to reduce heat. Crouch to stay undetected, and only fight if a zombie breaks through.
What should I build first in 7 Days to Die?
The first thing you should build in 7 Days to Die is a simple base or shelter with a secure door, wooden blocks, and spikes. Set up a bedroll inside, place storage chests for loot, and craft a campfire and a workbench when possible. Having a safe home base lets you explore and gather resources with confidence.
How do you survive Horde Night in 7 Days to Die?
To survive Horde Night in 7 Days to Die, design a horde base with a clear path for zombies leading into a kill zone, reinforce it with cobblestone or concrete, and set traps like spikes and electric fences. Stockpile ammo, repair your weapons and walls, and maintain stamina with coffee or food. Staying calm and repairing between waves is essential.