


How to Overclock GPU Safely: A Complete Guide for Gamers


Every gamer eventually wonders how to overclock GPU hardware to squeeze more performance out of their system. I’ve spent countless hours tweaking clock speeds, monitoring temperatures, and testing stability to find a process that works. This guide walks you through the essentials – what overclocking is, why it matters, and how to do it safely.
Jump to:
How to Overclock GPU: Basics and Safety
Before you launch a benchmark, it helps to know what overclocking means. A graphics processing unit runs at manufacturer‑set clock frequencies, which determine how fast it performs calculations. Overclocking pushes those clock speeds beyond default settings. This can boost gaming performance by giving you more frames per second or smoother gameplay without buying new hardware.
However, there are risks. An overclocked GPU draws more power and generates more heat, so you must monitor power consumption and temperature carefully. Manufacturers design some graphics cards with plenty of headroom, while others barely handle the extra load. Make sure your power supply can handle the added draw and that your case has adequate airflow. Our best GPUs for gaming article includes advice on choosing cards with excellent overclocking headroom.
You should also understand the difference between core clock and memory clock. The core clock controls how fast the GPU chip processes data, while memory clock speeds affect how quickly your graphics card accesses its onboard VRAM. Both can be adjusted, but increases should be incremental to avoid crashes.
Preparing to Overclock Your Graphics Card
The preparation stage determines whether your overclock is successful. Start by updating your GPU drivers to the latest version from AMD or Nvidia. New drivers often unlock additional stability and performance. Then run a few demanding games or benchmarks to establish a baseline. Take note of frame rates, core clock, and GPU temperature. This information will help you see how much improvement your overclock delivers.
Next, clean your system and improve cooling. Dust-clogged heatsinks and poor airflow raise temperatures and limit how far you can push your card. Our best gaming setup guide suggests adding extra fans or even liquid cooling to keep temperatures under control. On top of that, make sure your power supply has enough wattage for the added power limit you’ll set during overclocking.
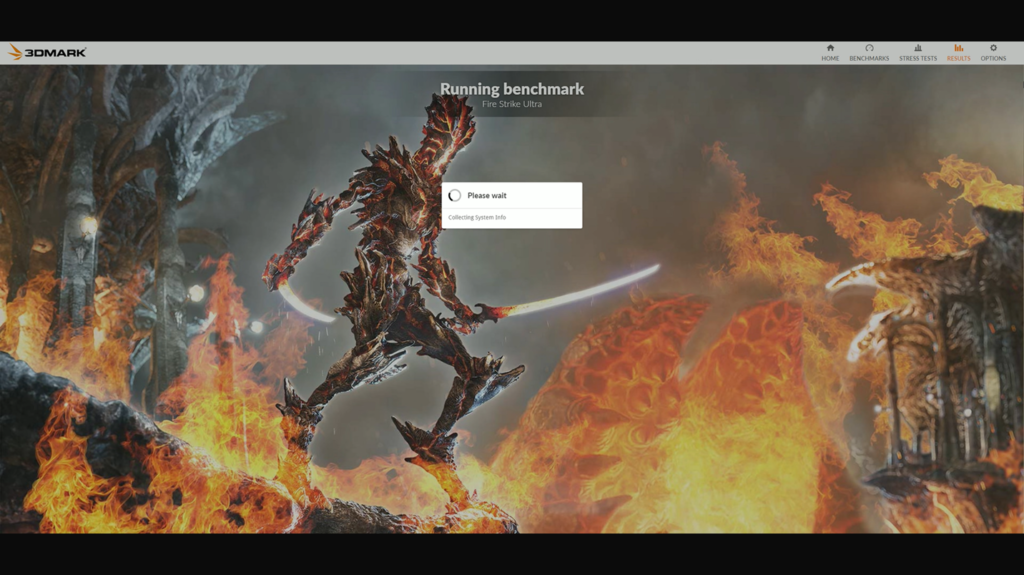
Finally, consider a stress test program. 3DMark, Unigine Heaven, or FurMark are widely used to stress the GPU. Each helps you identify instability before it ruins a long gaming session. Remember, every card reacts differently, so monitor how both the GPU and memory respond to higher clock frequencies.
Choosing the Right GPU Overclocking Software
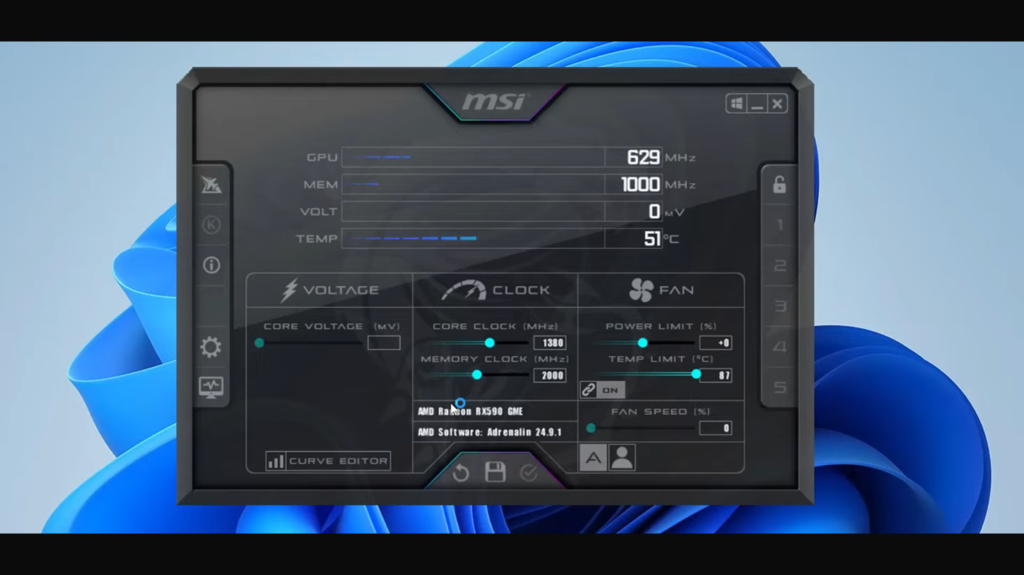
Selecting the right tool is half the battle. MSI Afterburner is the most popular GPU overclocking software for both Nvidia graphics cards and AMD Radeon chips. It provides sliders for core clock, memory clock, power limit, and fan speed. You can also monitor GPU temperature and set custom fan curves.
Another option is EVGA Precision X1, which is tailored for Nvidia GeForce chips but similar to Afterburner in function. AMD users can use AMD Radeon Performance Tuning built into Adrenalin drivers. It lets you increase clock speeds, adjust voltage, and create overclock profiles without third‑party software.
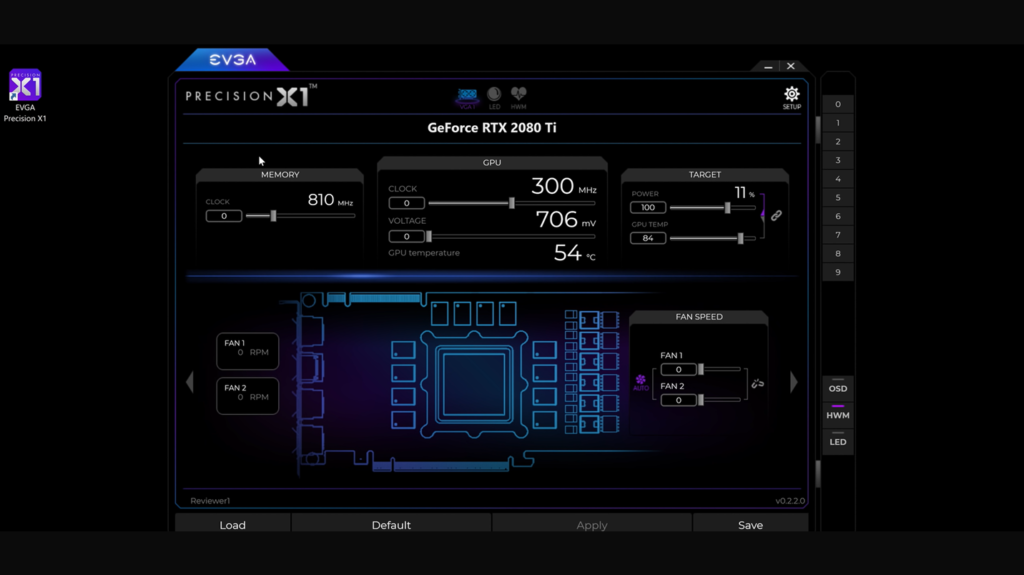
When choosing a GPU overclocking tool, consider ease of use and compatibility. Some programs also include in‑game overlays for monitoring temperature and clock speeds while you play. Whatever you choose, make sure the software allows incremental adjustments so you can manually overclock safely.
Step‑by‑Step: Overclock Your GPU Core and Memory
With preparation done and software installed, you’re ready to overclock your GPU. Here’s the process I use:
- Increase the power limit. In your overclocking tool, raise the power limit to its maximum. This allows the GPU to draw more energy and maintain higher core clocks without throttling.
- Adjust the temperature limit. If your software has a temperature slider, raise it slightly (but no higher than 90 °C for most cards). This tells the GPU driver not to throttle until it hits that temperature.
- Raise the core clock slowly. Start by increasing the core clock by 10–20 MHz. Apply the setting and launch your stress test. If there are no crashes or artifacts, increase again by 10–20 MHz. Continue until you see instability (crashes, screen flicker, or driver resets). When that happens, back down by one increment to find a stable value. Keep an eye on GPU temperature; don’t let it exceed the safe limit.
- Increase the memory clock. After finding a stable core clock, repeat the process with the memory clock speeds. Memory typically has more headroom than the GPU chip, so you can raise it by 50–100 MHz at a time. Again, stress test after each increase and stop when instability appears.
- Fine‑tune voltage (optional). Some overclocking software lets you adjust voltage. A slight voltage bump can stabilize a higher clock, but be cautious – too much voltage increases power consumption and heat. Only raise voltage if your power supply and cooling can handle it.
- Set a custom fan curve. Higher power limit and clocks generate more heat. Use your overclocking tool to create a fan curve that ramps up fan speeds as temperature rises. A louder fan is preferable to a fried GPU.
- Test in real games. Synthetic benchmarks don’t always reflect real‑world gaming. Run a few graphically intense games and monitor performance. If you see artifacts, drop the clocks slightly.
- Save your overclock settings. Once stable, save the profile so you can load it with a click. This ensures you’re ready to game without fiddling with sliders each time.
Throughout this process, remain patient. Manually overclocking is as much an art as a science. Rushing the steps or making large jumps in clock speeds increases the risk of system crashes.
Stress Testing and Monitoring GPU Temperature
A proper GPU stress test is essential for a safe overclock. Tools like FurMark, Unigine Heaven, or 3DMark loop heavy graphical scenes to push both the GPU and VRAM to their limits. Run your stress test for at least 20–30 minutes after each clock adjustment. Watch for graphical artifacts, driver resets, or blue screens. These are signs of an unstable overclock.
Alongside stress testing, monitor GPU temperature using your overclocking software or third‑party tools. A safely overclocked card should stay under 85 °C during extended load. If temperatures climb higher, clean dust from heatsinks, improve case ventilation, or scale back your overclock. Also, check how the overclock affects power consumption. A big jump in wattage could stress your power supply or trip its protection circuits.
Our article on best AMD GPUs for every budget discusses models with good thermal design and factory overclocking. These cards often hold higher clocks without much tweaking.
Overclocking Laptop and Integrated GPUs
Many gamers ask whether they can overclock a laptop GPU. Technically, it’s possible, but rarely recommended. Laptop cooling is less robust, and increasing clock speeds quickly leads to thermal throttling. Battery life suffers because the GPU runs at higher clocks and voltage. Some manufacturers lock power settings to protect internal components.
If you’re determined to try, update your BIOS and GPU drivers, use small increments, and monitor temperatures constantly. However, you’ll get better performance by using a dedicated graphics card in a desktop PC. Integrated graphics on CPUs are not designed for overclocking; they draw from system memory and lack proper cooling. Instead, invest in an entry‑level discrete card to enjoy a noticeable leap in performance.
Unlocking Extra Performance the Safe Way
Overclocking is one of the few ways to boost gaming performance without spending money on new hardware. By understanding the difference between core clock, memory clock, and power limits, and by using reliable overclocking tools, you can safely overclock and enjoy smoother gameplay.
Always stress test after adjustments, watch your temperatures, and make sure your power supply and cooling are up to the task. If your GPU becomes unstable or temperatures climb too high, don’t push further. Drop back to a safe overclock that you can maintain daily.
When you’re ready to put your new hardware to the test, consider picking up a new game or adding funds to your digital library. A $50 Steam Wallet Gift Card from our marketplace lets you download the latest AAA titles and enjoy your overclocked performance to the fullest. It’s an easy way to explore demanding games that showcase your GPU’s power.
FAQs
How do I overclock my GPU?
To overclock your GPU, use software like MSI Afterburner or AMD Radeon Performance Tuning to increase core and memory clock speeds gradually. Start with small increments, stress test after each adjustment, and monitor temperatures to ensure stability.
Is overclocking GPU safe?
Overclocking GPU hardware is safe when done properly, because you’re increasing clock speeds slowly while monitoring temperature and power. You should always respect manufacturer limits, avoid extreme voltage increases, and provide adequate cooling to prevent damage.
Does overclocking improve gaming performance?
Yes, overclocking can improve gaming performance by boosting frames per second and reducing stutter. The gains vary depending on the GPU model and how far you push clocks, so don’t expect miracles. Most users see a 5–15 percent improvement.
How can I check if my overclock is stable?
To check if your overclock is stable, run a GPU stress test like 3DMark or Unigine Heaven for 20–30 minutes and watch for crashes or visual artifacts. Follow up by playing several graphically intense games to ensure the overclock holds under real‑world conditions.
Can I overclock an integrated or laptop GPU?
You can attempt to overclock an integrated or laptop GPU, but it’s generally not recommended. Laptops and integrated graphics lack robust cooling, so even small clock increases lead to high temperatures and throttling, which can reduce component lifespan.