

How to Overclock RAM in BIOS: Tuning Memory for Better Performance


Learning how to overclock RAM in BIOS is a great way to enjoy smoother gameplay and shorter load times without buying new hardware. By raising your memory’s speed and tightening its timings, you can unlock extra bandwidth and shave off precious milliseconds from data transfers.
I still remember the first time I enabled an extreme memory profile on my own PC and watched frame rates climb in Borderlands 3. It felt like finding hidden power that was waiting to be tapped.
In this guide, I’ll explain what memory overclocking is, how to prepare your system, and the safe steps you need to follow to get more performance without risking stability. I’ll also touch on manual tuning, stability testing, and whether a modest overclock is worth the effort.
Jump to:
How to Overclock RAM in BIOS – What It Means and Why It Matters
When people talk about overclocking, they usually think of CPUs or graphics cards. Overclocking your system’s memory works in a similar way: you modify the DRAM settings so the modules run faster than the manufacturer’s stock specification.
Two numbers define memory performance: frequency (measured in megahertz) and latency (often described by four timing values such as 16‑18‑18‑38). Higher frequency allows data to move between the CPU and RAM more quickly, while lower latency reduces the number of cycles the memory controller waits before completing an operation. When you tune both, games and heavy applications can feel more responsive.
The catch is that not every kit has the same headroom. Variations in manufacturing mean some sticks can hit high frequencies with little effort, while others top out sooner – a hardware lottery that also affects CPUs and GPUs. Running memory above the default speed may also require raising DRAM voltage, which increases heat and electrical stress. That’s why I approach tuning gradually and keep an eye on temperatures and stability. If you’re curious to dive deeper, our step‑by‑step RAM overclocking guide explains the science behind memory speed and timing tweaks in more detail.
Preparing Your System Before You Overclock RAM
Successful overclocking starts long before you touch a BIOS slider. First, verify that your hardware supports memory tuning. Check your motherboard manual or product page to confirm it offers XMP (Intel) or EXPO/DOCP (AMD) profiles and manual overclocking options.
Boards built with strong voltage regulation, like the ASUS ROG Maximus Z790 Dark Hero, can push DDR5 modules past 8000 MHz. Your CPU matters, too, because the memory controller lives on the processor. Newer Intel and AMD chips often support higher memory frequencies, so consult your CPU’s specification sheet to understand its limits.
Cooling and power are equally important. Overclocked RAMs generate extra heat, and the additional voltage you apply stresses both the modules and the memory controller. Make sure your case has good airflow and that your CPU cooler isn’t already struggling.
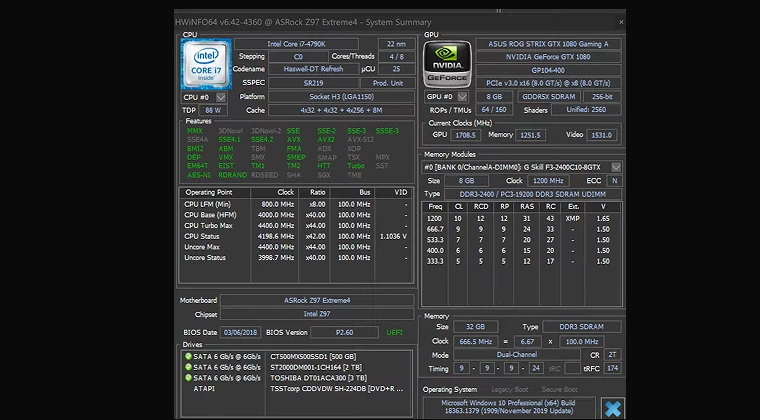
Before making changes, back up your important files. Pushing memory too far can cause random reboots or data corruption. Next, establish a baseline so you can measure gains and spot problems early. Tools like CPU‑Z, HWiNFO, or the Performance tab in Task Manager show your current DRAM frequency, timings, and voltage. Run a benchmark or a game you play often and record the average and minimum frame rates. This baseline will let you confirm when your verification efforts are successful and will help you decide when to stop.
For readers who plan to overclock the entire system, not just memory, our CPU overclocking guide covers how to verify hardware compatibility, assess cooling, and adjust voltages safely. I often find that tuning the processor and RAM together yields a balanced performance increase, provided you proceed with small steps and keep your system’s security and stability in mind.
Enabling XMP or EXPO Profiles for an Easy Boost
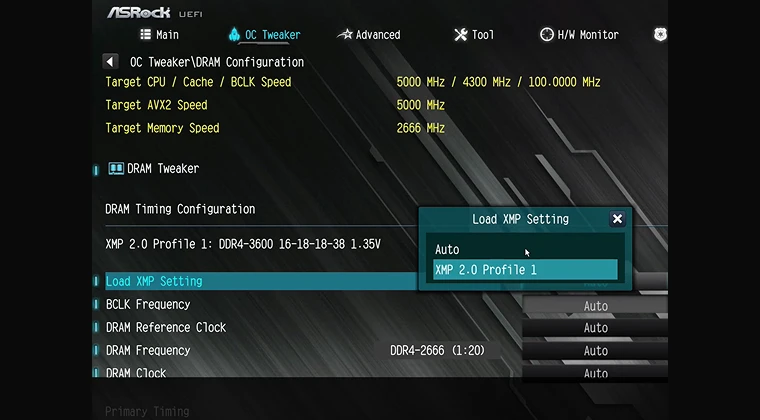
The easiest way to learn how to overclock RAM in BIOS is to use the pre‑defined profiles stored in your memory modules. These settings – called XMP on Intel platforms and EXPO or DOCP on AMD boards – tell the BIOS how to adjust memory frequency, voltage, and timings automatically.
When you enable a profile, your RAM typically jumps from the standard JEDEC speeds (2133–2666 MHz for DDR4, 4800 MHz for DDR5) to the rated speed advertised on the box. I’ve seen bandwidth improvements of 10–20 % just by selecting the right profile.
To enable a profile:
- Restart your PC and press the key shown on the boot screen – usually Delete, F2, or Esc – to enter BIOS. I like to use a USB keyboard with a fast response to ensure the key press is detected.
- Navigate to the memory or overclocking section. Manufacturers label it differently: on ASUS boards it’s called AI Tweaker, on MSI it’s Extreme Tweaker, and on Gigabyte it may be simply Memory Settings.
- Look for an option labeled XMP, DOCP, or EXPO. Select Profile 1 for a moderate boost or Profile 2 for a more aggressive setting. The BIOS will show the target frequency and timings. Highlight your choice and confirm the change.
- Save and exit. Your system will reboot, and you can return to Windows. Use the monitoring tools from earlier to check that the new settings are applied.
Motherboards designed for overclocking make this process easier. Our list of the best motherboards for the Intel i9‑14900K covers models with clear CMOS and BIOS flashback buttons. These features allow you to recover quickly if the system fails to post after enabling a profile. If you plan to build a new rig around high‑speed DDR5 modules, investing in such a board can save time and frustration.
Manual Overclocking: Fine‑Tuning Frequency, Voltage, and Timings
Enabling an XMP or EXPO profile is just the beginning. If you want to squeeze every last bit of performance from your memory, manual tuning lets you tailor the settings to your specific PC. I approach manual overclocking in small increments to avoid trips down a voltage rabbit hole.
- Find your starting point. If you’ve enabled a profile, use it as your baseline. Otherwise, note your current DRAM frequency and timings. Enter BIOS and locate the memory frequency option. For DDR4, increase the clock in 200 MHz increments; for DDR5, 100 MHz steps are sufficient. After each change, save and reboot. If the system posts and loads Windows, run a quick stability test. If it fails to boot, return to BIOS and dial back the frequency.
- Adjust voltage carefully. Higher frequencies often require a bit more voltage to remain stable. Start with the default voltage – typically 1.2 V for DDR4 and 1.25 V for DDR5 – and increase it by 0.01 – 0.05 V only when necessary. Don’t exceed the maximum recommended by your memory’s datasheet (around 1.4 – 1.5 V for DDR4 and 1.45 V for DDR5). Be aware that raising DRAM voltage also warms up the memory controller; monitoring temperatures is important.
- Tighten the timings. Once you’ve found a frequency that boots reliably, experiment with lowering the primary timings: CAS latency (tCL), tRCD, tRP, and tRAS. Reduce one value at a time and reboot. If the system fails to start or crashes under load, revert to the previous stable timing. Balancing frequency and latency is an art – sometimes a slightly lower frequency with tighter timings delivers better real‑world performance.
- Don’t forget secondary voltages. On Intel platforms you may need to tweak VCCIO and VCCSA voltages, and on AMD boards the SOC voltage, to keep the memory controller happy. Adjust these sparingly and always record your changes so you can revert if needed. When I pushed my DDR4 kit beyond 3600 MHz, raising the SOC voltage by 0.05 V made the difference between stability and random crashes.
Manual tuning takes patience. It’s easy to lose track of changes, so I like to keep a notebook or spreadsheet with each step, the voltage, and whether the system booted or passed a stress test.
To maintain a safe temperature envelope, refer to our guide on checking CPU temp and managing heat, which explains how to monitor thermal sensors and adjust fan curves for stable operation. Remember that there’s no universal formula; each RAM kit and motherboard combination behaves differently, and the goal is to find a sweet spot where verification is successful and the performance gain is worth the effort.
Testing and Troubleshooting Your Overclock
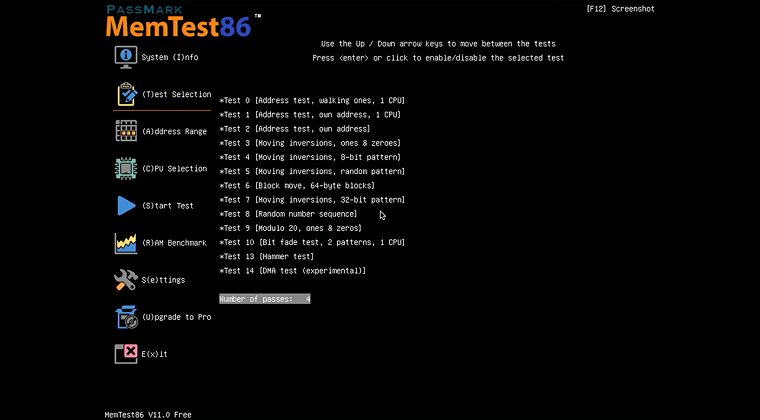
Even if the system boots, you aren’t finished until you’ve tested the overclock under load. Stress testing validates your settings and protects your data. I use a mix of tools: MemTest86 for pure memory checks, Prime95’s Blend test for a combination of CPU and RAM stress, and AIDA64 or similar benchmarks to measure bandwidth and latency. Let the tests run for at least an hour or until they complete multiple passes without errors.
During testing, monitor voltages and temperatures; if you see the memory voltage sagging or the CPU climbing past safe temperatures, lower the settings or improve cooling.
Signs of instability include application crashes, sudden reboots, blue screens, or visual glitches during games. If you encounter these issues, revert to the last stable configuration and proceed with smaller adjustments. Keep in mind that some problems only appear after extended use.
Troubleshooting also involves checking related components. Higher DRAM voltage can raise the temperature of the CPU’s memory controller. Use monitoring software to ensure your processor stays below about 85 °C under load. If necessary, adjust your cooling solution or fan curves. And don’t overlook the power supply: unstable power delivery can cause memory errors, so verify that your PSU can handle the extra demand.
Finally, remember to save your stable settings as a BIOS profile if your motherboard supports it. This makes it easier to switch between a balanced configuration for everyday tasks and a more aggressive one for gaming sessions. Creating multiple profiles also allows you to experiment without losing the configuration that works.
Should You Overclock RAM or Stick to Stock Settings?
Deciding whether to overclock your memory comes down to balancing effort, risk, and reward. Enabling an XMP or EXPO profile is almost always worthwhile because the gains are free and require just a few clicks. Manual overclocking, however, provides diminishing returns. Most systems see a modest improvement in memory bandwidth, which can translate into a handful of extra frames or shorter loading times in memory‑intensive games. If your rig already performs well at your target resolution and frame rate, there’s no need to push the memory further.
On the other hand, overclocking can extend the life of an older machine. It’s also a learning experience; it teaches you how your motherboard, CPU, and RAM interact and fosters a deeper connection with your hardware. For many people in the PC gaming community, that knowledge alone is valuable.
There are situations where stock settings make more sense. If your memory modules lack overclocking headroom, pushing them can cause instability without meaningful gains. Users who rely on their PCs for work or can’t risk crashes may prefer the guaranteed stability of JEDEC speeds. Overclocking typically voids the warranty on RAM kits and some motherboards, so check your warranty terms before proceeding. And if you need more than a small performance boost, upgrading to a higher‑speed kit or adding more memory might be a better investment than spending hours fine‑tuning.
Unlocking Extra Performance and Enjoying the Results
Learning how to overclock RAM in BIOS is both a practical skill and a fun hobby. Start by verifying your hardware, updating firmware, and establishing a baseline. Use XMP or EXPO profiles for quick gains, then explore manual tuning by raising frequency, adjusting voltage, and tightening timings in small steps.
Stress test thoroughly and keep an eye on temperatures and voltages to maintain security and stability. In many cases, a modest memory overclock can smooth out gameplay and extend the life of your system without spending money on new hardware.
Once you’ve dialed in a stable overclock, put your extra bandwidth to good use. Few games showcase the benefits of improved memory performance better than Cyberpunk 2077. The dense, futuristic world of Night City features complex AI routines and detailed environments that benefit from higher memory bandwidth. Pair your tuned RAM with this sprawling RPG and enjoy smoother frame rates and quicker load times as you explore the open world.
FAQs
How do I overclock RAM in BIOS?
To overclock RAM in BIOS, enter setup, choose the XMP or EXPO profile for a quick boost, then increase DRAM frequency a bit at a time. Adjust voltage carefully and run stress tests after every change to make sure the system stays stable.
Is it safe to overclock RAM?
Yes, it is safe to overclock RAM if you keep the voltage within the module’s limits and watch temperatures. Increase settings slowly, test stability each time, and back up data so you can restore it if instability occurs.
Does overclocking RAM increase FPS?
Yes, overclocking RAM increases FPS by boosting memory bandwidth and lowering latency, so the CPU gets data faster. Gains are usually modest, around 5–15 %, and show up most in games that depend heavily on memory speed.
Can I overclock RAM without XMP or EXPO profiles?
Yes, you can overclock RAM without XMP or EXPO by adjusting the DRAM frequency, voltage, and timings manually in BIOS. Start at stock settings, raise frequency slowly, add voltage only when necessary, and test for stability at each step.
Will overclocking RAM void my warranty?
It depends on the manufacturer; overclocking RAM may void your warranty if damage results from manual voltage or extreme settings. Most brands cover XMP or EXPO, but custom tuning could be excluded, so read your kit’s warranty.