


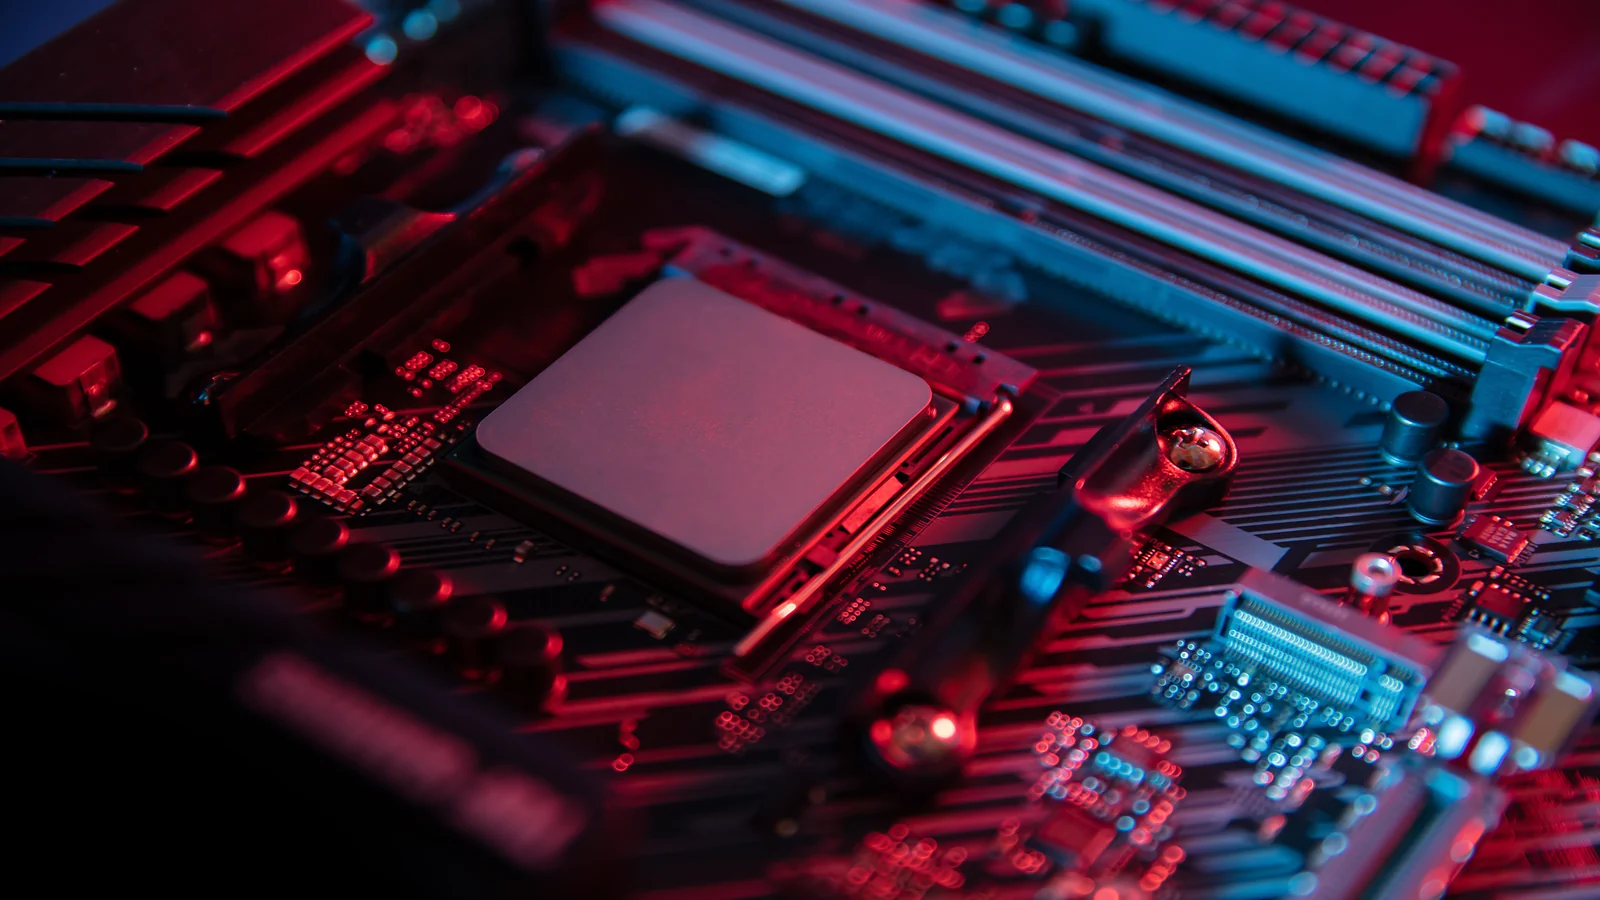
How to Overclock CPU Safely: Complete Guide for PC & Laptop (2026)


Learning how to overclock CPU safely is easier than most people think, even if you’re not an expert. It’s one of those topics that divides the PC community: some gamers swear by it, squeezing every last bit of performance from their hardware, while others see it as a risky endeavor best left to specialists. In this guide, I’ll cover the basics, the benefits and risks, and the methods that work for most modern chips, so you have everything you need to decide if overclocking is right for you, and how to do it without damaging your rig.
Jump to:
How to Overclock CPU – Step‑by‑Step Guide
Tools and Equipment You’ll Need
Before you learn how to overclock CPU, make sure you have the right hardware and software in place:
Hardware:
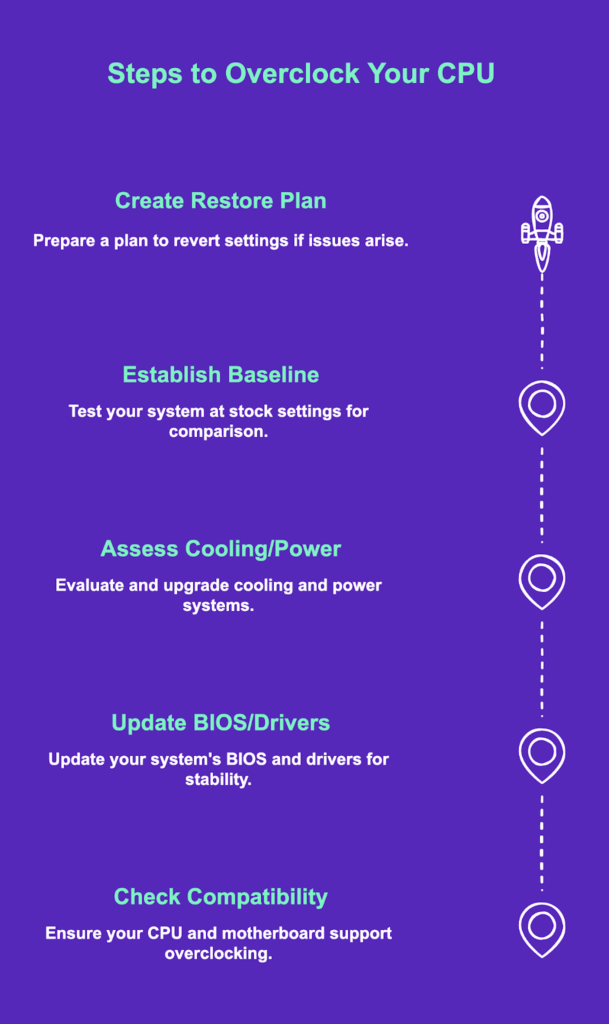
- Unlocked CPU + compatible motherboard – Intel K/KF/KS chips with a Z-series board (Z790, Z690), or AMD Ryzen with a B- or X-series board. Check out our best motherboards for gaming for overclock-friendly picks with strong VRMs.
- Aftermarket cooler – stock coolers aren’t built for overclocking. Go for a quality air cooler or AIO liquid cooler.
- Beefy PSU – overclocking adds 100–150W of draw, so give yourself headroom above your current load.
Software:
- Benchmarks (Cinebench, Geekbench) – measure performance gains at each step
- Stress testers (Prime95, AIDA64, OCCT) – verify stability after each change
- Hardware monitors (HWiNFO, Core Temp) – track temperatures and voltages in real time
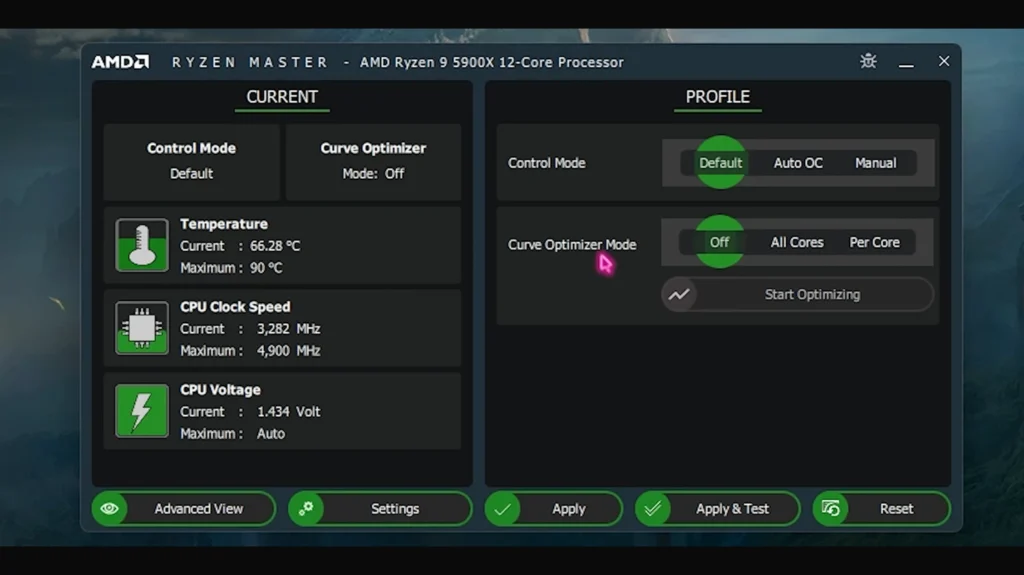
- Tuning utilities (Intel XTU, AMD Ryzen Master) – good for beginners, though the BIOS gives you the most control
Before You Begin:
- Update BIOS + chipset drivers – manufacturers release updates that improve stability and fix overclocking bugs; always do this first
- Establish a baseline – run Cinebench or Geekbench at stock settings and note your temps, voltages, and clock speeds before touching anything
- Create a restore point – set a system restore point in your OS and locate your motherboard’s CMOS reset button in case things go sideways
With all of this in place, you’re ready to start overclocking.
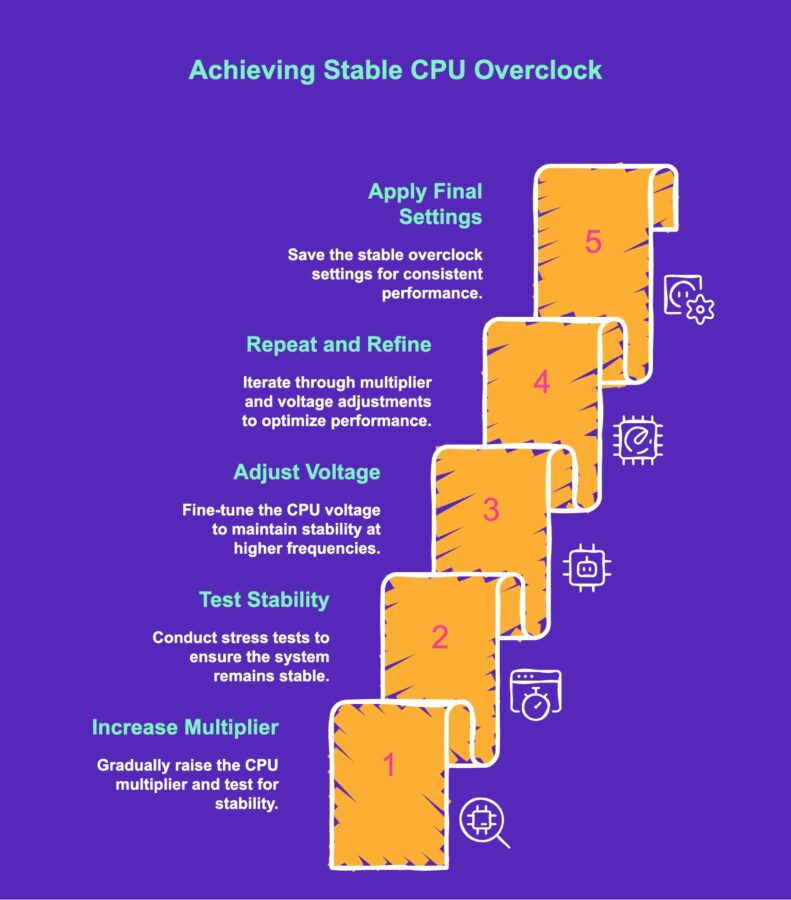
Step 1: Increase the Multiplier Gradually
After entering the BIOS (usually by pressing Delete, F2, or F10 during boot), locate the CPU or overclocking section. Disable any automatic overclocking features to gain control. Start by increasing the CPU multiplier by one step. For instance, if your chip runs at 40×100 MHz (4.0 GHz), raise the multiplier to 41. Save changes and reboot.
Back in the operating system, run a short benchmark or stress test. If the system is stable and temperatures remain within safe limits (ideally below 80 °C for extended tests), repeat the process, adding one multiplier at a time. This slow progression helps isolate the exact point at which instability occurs. Keep notes on each multiplier and the corresponding voltage and temperature. Avoid large jumps; they make it hard to diagnose issues.
Step 2: Test Stability
After each increment, run a longer stress test (30 minutes to an hour). Watch for crashes, freezes, or errors. If the system locks up, reset and return to the BIOS. A stable overclock should complete the stress test without errors or temperature spikes. Remember that short tests may pass even if long‑term stability is questionable. For your final overclock, run stress tests for two hours or more.
Step 3: Adjust Core Voltage
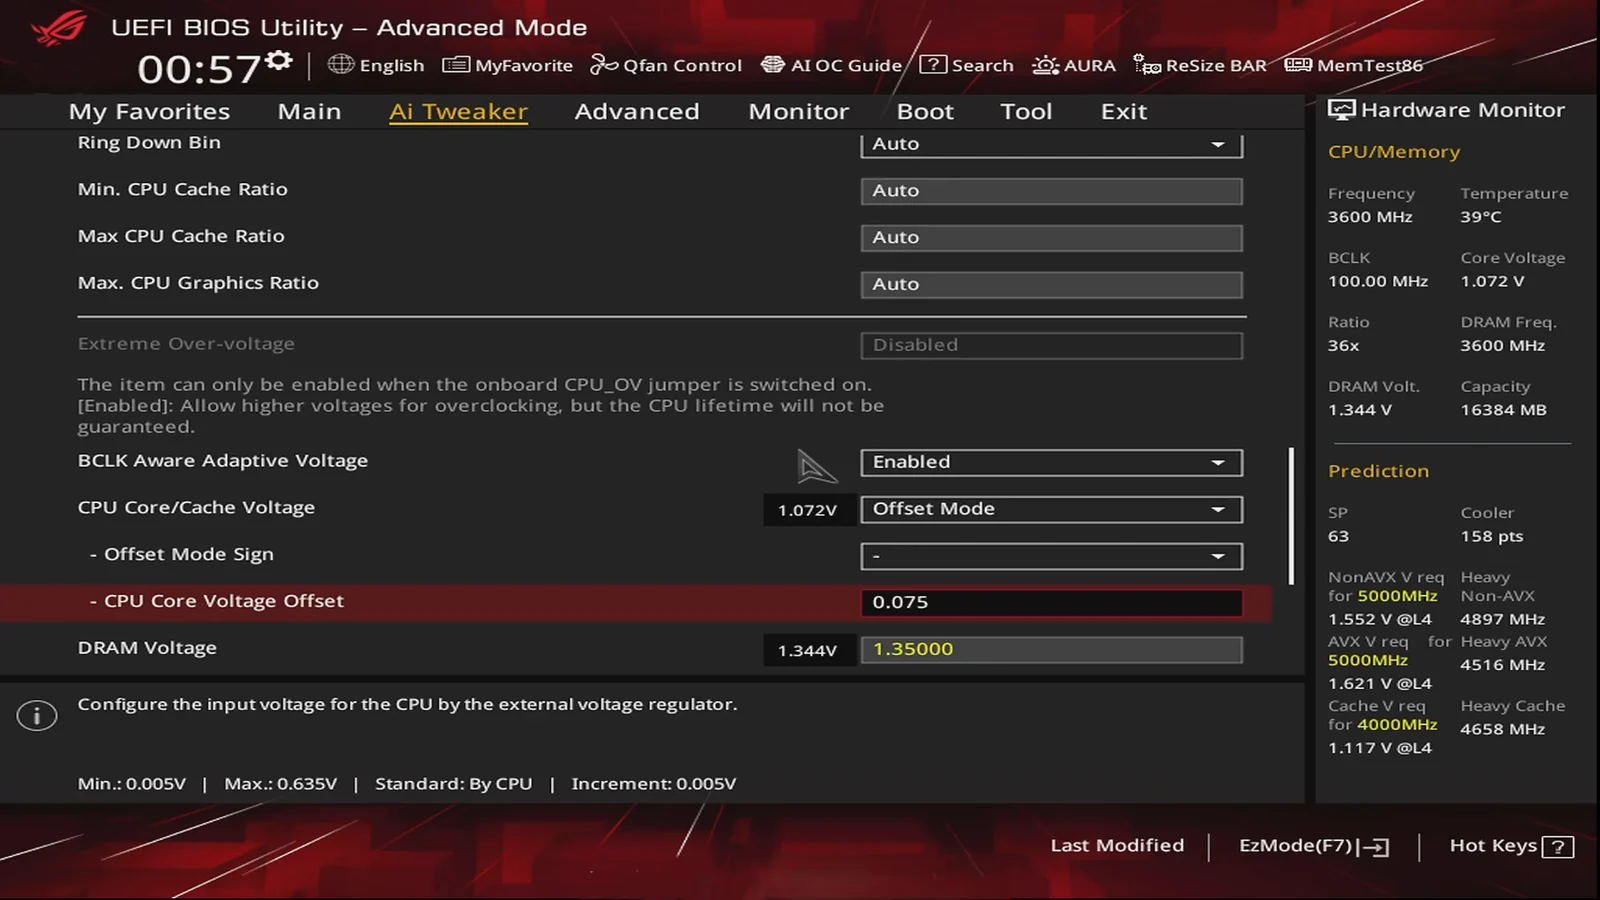
As you reach higher multipliers, the CPU may require more voltage to remain stable. In the BIOS, locate the Vcore or CPU core voltage setting. Increase it in small increments, around 0.025 V. After each change, test again. Higher voltage improves stability but raises heat output. Keep a close eye on temperatures and never exceed the manufacturer’s safe limits (usually under 1.4 V and below 100 °C for short bursts). I recommend finding the lowest voltage that supports your desired frequency. If raising the voltage pushes temperatures too high, reduce the multiplier instead. Stability comes from a balance of frequency and voltage, not from maxing out both.
Step 4: Repeat and Refine
Continue alternating between raising the multiplier, testing, and adjusting the voltage. As you approach the limits of your cooling or chip, the benefits of each extra 100 MHz diminish. There is a point where additional voltage creates more heat than the performance gain is worth. Listen to your system (fans ramping up, coil whine from the VRMs, or unusual smells are warnings). Once you hit a crash, even with a voltage bump, back off by one multiplier and test again. Run extended stress tests to confirm stability. Document the final settings and save them as a profile in your BIOS if possible.
Step 5: Apply Final Settings
When you find a configuration that survives long stress tests and keeps temperatures at acceptable levels, commit those settings. Some overclockers like to add a small safety margin by reducing the multiplier by one step or lowering voltage slightly. This ensures stability on hot days or under unpredictable workloads. Save your BIOS profile and note your settings for future reference. Congratulations, you’ve successfully overclocked your CPU.
How to Overclock CPU for Gaming – FPS Gains by Game
If you’re wondering if learning how to overclock CPU is actually worth it for gaming, here’s a rough idea of what you can expect in some of the most demanding titles:
- Cyberpunk 2077 – a CPU-heavy open world that responds well to overclocking. Expect roughly 10-15% FPS gains at high settings, particularly in dense urban areas where CPU load spikes.
- CS2 – extremely CPU-dependent at high framerates. An overclock can push you past framerate targets that matter competitively, with gains of 10-20% not uncommon.
- Elden Ring – notoriously CPU-intensive in certain areas. An overclock can smooth out stutters and improve minimum framerates by around 10-15%.
Keep in mind that actual gains vary depending on your specific CPU, cooling, and how far you can push your overclock. A modest 5-10% clock speed increase won’t transform your system, but combined with a stable long-term overclock, it adds up, especially on older hardware.
What Is CPU Overclocking?
To understand how to overclock CPU, you need to know how clock speed works. Every processor leaves the factory with a base clock and a boost clock set in its firmware – values chosen to guarantee stable performance across a wide range of conditions.
Overclocking intentionally pushes those numbers higher by raising the multiplier (and sometimes the base clock). For example, a 100 MHz base clock multiplied by 44 gives you 4.4 GHz, bump that multiplier up and you get more performance, but also more heat since the CPU needs higher voltage (Vcore) to stay stable.
Not all CPUs are created equal here. Intel‘s K, KF, and KS chips and most AMD Ryzen processors have unlocked multipliers, which makes them the easiest to tune. Non-K Intel CPUs and most laptop chips lock the multiplier. Also worth noting; overclocking typically voids your manufacturer’s warranty, so go in with eyes open.
Is Overclocking CPU Safe? Risks and Precautions
Before you learn how to overclock CPU, it’s worth knowing what you’re getting into. The appeal is obvious: more performance without buying new hardware – faster frame rates, shorter render times, and a longer useful life for your system. When I overclocked an older Ryzen 5 on my secondary PC, I gained about 15% performance in Cyberpunk 2077 without spending a penny.
The risks are real, though. More voltage means more heat, and without proper cooling that leads to thermal throttling, crashes, or a shortened CPU lifespan. Overclocking also typically voids your warranty, and instability symptoms like BSODs or random reboots mean you’ve pushed too far. Since no two CPUs behave identically, testing every increment carefully is non-negotiable.
AMD’s Ryzen chips with 3D V-Cache deliver strong gaming performance even at stock, while Intel’s latest chips often hit high frequencies out of the box. Our AMD vs Intel processors guide can help you decide whether overclocking is even worth it for your setup.
Can You Overclock a Laptop CPU?
If you’re wondering how to overclock CPU on a laptop, the short answer is: usually you can’t, and probably shouldn’t. Most laptops have locked multipliers and BIOS options too restricted to allow meaningful tuning. Thin-and-light models especially are engineered for efficiency, not sustained high power draw, so even small increases in heat can trigger throttling or cause long-term damage.
The exception is gaming laptops with Intel HK-series chips, which have unlocked multipliers and occasionally offer some BIOS tuning options. If you have one, proceed with extra caution; laptop cooling systems are built for a very specific thermal envelope, and there’s little headroom for error.
For most laptop users, undervolting is the smarter move. It reduces the CPU’s voltage while keeping stock frequencies intact, which lowers temperatures, reduces throttling, and can even extend battery life, all without pushing the hardware beyond its design limits.
How to Troubleshoot Overclocking Problems
Even a carefully planned attempt to overclock CPU can run into issues. Here are the most common problems and how to fix them:
- System crashes or BSODs – usually a sign that voltage is too low for your current clock speed. Try increasing Vcore in small increments (0.025V), or drop the multiplier by one step and retest.
- Overheating – if temps are pushing past 80°C under load, increase fan speeds, reposition case fans, or reseat your cooler with fresh thermal paste. If that doesn’t help, the overclock is simply too aggressive for your cooling setup, so dial it back.
- Failed stress tests – short tests passing but long ones failing usually means your overclock is borderline unstable. Lower the multiplier by one step and run a full 2-hour stress test before proceeding.
- System won’t boot – don’t panic. Use your motherboard’s CMOS reset button to restore factory defaults, then re-enter your settings more conservatively.
- Random restarts or coil whine – signs you’re pushing the VRMs too hard. Reduce clock speed or voltage, and make sure your PSU has enough headroom.
- Unstable memory after enabling XMP – try lowering memory frequency slightly or relaxing timings. Memory instability can mimic CPU overclock issues.
If problems persist after rolling back, return fully to stock settings and troubleshoot from baseline before attempting to overclock your CPU again.
Maintaining Your Overclocked System
Learning how to overclock CPU is only half the battle, keeping it stable long-term takes some ongoing attention. Here’s how to stay on top of it:
- Monitor Temperatures and Voltages: Use HWiNFO or Core Temp to track CPU temperatures, voltages, and frequencies during gaming or heavy workloads. Keep temps below 80°C under prolonged load. If temperatures creep up over time, clean your fans and heatsinks and consider replacing thermal paste. Some motherboards let you set temperature alarms, so use them.
- Stress Test Regularly: An overclock that’s stable today might not be in three months. Repeat stress tests periodically – Prime95 for floating-point, AIDA64 for mixed operations, and a real-world benchmark like gaming or rendering. Schedule these after major software updates or seasonal temperature changes.
- Maintain Your System: Keep dust filters clean, update BIOS and firmware regularly, and document your settings so you can reapply them after a CMOS reset or OS reinstall. A configuration that runs fine in winter might overheat in summer – adjust fan curves accordingly.
If your system struggles to stay stable despite proper maintenance, it might be time to consider an upgrade. Our guide to the best CPUs for gaming covers processors that deliver excellent performance without needing to push your hardware to its limits.
Advanced Overclocking Techniques
Once you master the basics, you might explore advanced methods to squeeze out a little more performance. These techniques require more knowledge and carry a higher risk, so proceed carefully.
Per‑Core Overclocking
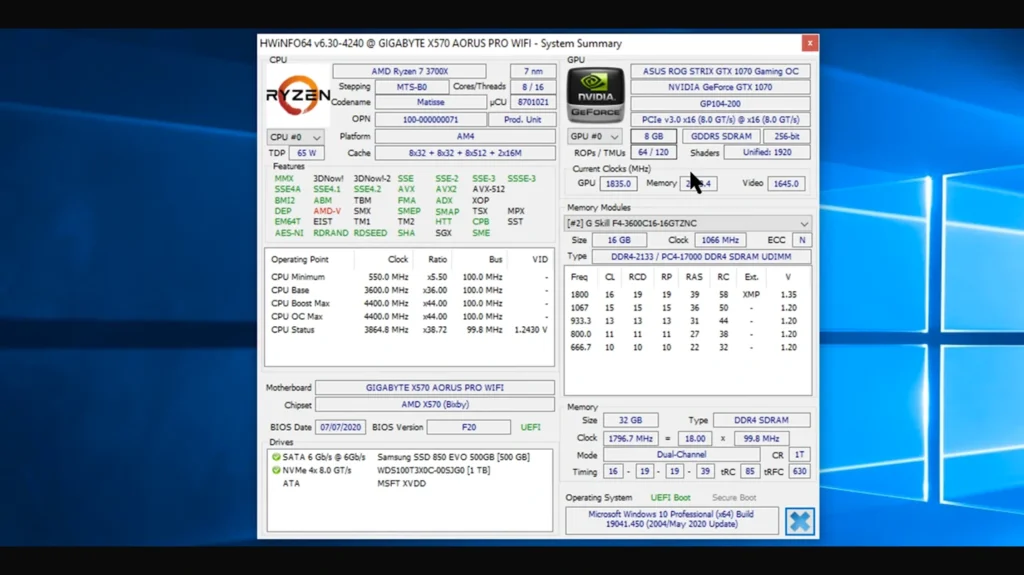
Not all cores on a CPU are equal. Some can sustain higher frequencies than others due to manufacturing variation. In per‑core overclocking, you assign different multipliers to each core. Tools like HWiNFO help identify strong cores. In the BIOS, set higher multipliers for those cores and lower ones for weaker cores. This can yield higher single‑threaded performance without destabilizing the entire CPU. However, it requires extensive testing, as each combination of multipliers must be verified.
Base Clock (BCLK) Overclocking
Instead of increasing the multiplier, you can raise the base clock in small increments (1–2 MHz). This method benefits processors with locked multipliers, though raising BCLK also affects memory, PCIe, and other system buses. A minor change can cause instability in devices connected via those buses. Because BCLK influences multiple components, only advanced users should attempt it. Always monitor system temperatures and test each step thoroughly.
AVX Offset and Voltage Curves
Advanced workloads that use AVX instructions (like video encoding or scientific simulations) generate more heat. Setting an AVX offset lowers the multiplier during AVX workloads. For example, if your base overclock is 46×, an AVX offset of –2 drops the multiplier to 44× when AVX instructions run, keeping temperatures under control. Voltage curves or adaptive voltage modes can also help by supplying more voltage only when needed and reducing it at idle. These features are often found on higher‑end motherboards and require experimentation.
Memory Overclocking
CPU overclocking works hand in hand with memory tuning. Enabling XMP (Intel) or DOCP (AMD) profiles in the BIOS sets the memory speed and timings to their rated values. Manual memory overclocking involves adjusting frequency, timings, and voltages beyond those values. For AMD Ryzen systems, matching the Infinity Fabric clock (FCLK) to half the memory speed can improve performance. Memory overclocking is complex and benefits from dedicated testing tools like MemTest86. Unless you’re chasing benchmark records, enabling XMP/DOCP is usually enough.
Software Tuning Utilities
Intel XTU and AMD Ryzen Master provide graphical interfaces for overclocking within Windows. They allow on‑the‑fly adjustments and can automatically scan for stable configurations using AI algorithms. The latest Intel XTU, for example, includes an AI assist mode that estimates stable settings for supported processors. These tools are user‑friendly and good for beginners, but they may not expose every BIOS option. Always back up your settings before using them, and understand that results may vary across different motherboards and cooling setups.
When to Stop
Pushing a CPU to its absolute limit provides diminishing returns. The last few hundred megahertz may require large voltage increases and cause significant heat. Ask yourself if the performance gain justifies the added stress. At a certain point, it may make more sense to upgrade to a newer chip. Our breakdown of top gaming CPUs covers processors that offer strong performance at stock speeds and may make overclocking unnecessary.
Optimizing RAM and GPU Overclocking
Although the focus here is on the CPU, memory, and graphics card, overclocking can complement your efforts. Some games benefit more from faster RAM than from higher CPU frequency, particularly on AMD platforms. Enabling XMP or DOCP automatically adjusts memory to its rated speed and timings. For advanced users, manually tightening timings (reducing CL, tRCD, tRP, and tRAS) can improve responsiveness, but each change requires testing.
Modern GPUs also support overclocking through vendor tools like MSI Afterburner or EVGA Precision X1. In fact, you can improve frame rates simply by increasing the core and memory clocks. GPU overclocking is usually safer than CPU overclocking because graphics cards have built‑in power and thermal limits. However, raising GPU clocks will increase system temperature and may require additional case airflow. Balance GPU and CPU overclocks so that neither component becomes a bottleneck. And honestly, when I overclocked my graphics card alongside my CPU, I found that a modest GPU tweak combined with a stable CPU boost delivered the best results in competitive shooters.
Tips for Safe Overclocking

Here are some general guidelines to keep your overclocking journey safe and enjoyable:
- Start small. Incremental changes allow you to identify the point of instability and avoid unnecessary risk. Jumping directly to high frequencies is tempting but often results in crashes.
- Record everything. Keep a log of multipliers, voltages, and temperatures at each step. This makes it easier to replicate settings or revert when troubleshooting.
- Prioritize cooling. Invest in a quality cooler and ensure good case airflow. It’s better to have cooling headroom you never use than to hit a thermal wall.
- Choose a strong power supply. High‑quality PSUs provide stable power and protect your components. Aim for a unit with at least 150 watts of headroom beyond your expected load.
- Avoid extreme voltage. Stay within manufacturer‑recommended voltage ranges. Exceeding 1.4 V on most CPUs dramatically increases heat and risk.
- Update regularly. BIOS and driver updates can improve stability and fix bugs that affect overclocking.
- Know when to stop. Pushing hardware endlessly for marginal gains isn’t worth damaging it. If stability requires too much voltage or the temperature limit is near, dial back.
When Upgrading Makes More Sense
Overclocking can extend the life of an older system, but it isn’t always the best solution. Here are situations where buying new hardware is a better use of your time and money:
- Thermal and power limits. If your CPU hits 80 °C at stock speeds or your power supply is already at capacity, an overclock will likely lead to overheating or shutdowns. Upgrading to a more efficient chip or a better PSU may be safer.
- Minimal gains. Some chips, especially recent Intel and AMD models, run close to their maximum safe frequency out of the box. Overclocking might add just 100–200 MHz, which may not justify the risk or power usage.
- Platform limitations. Locked CPUs or motherboards without robust VRMs limit your ability to tweak settings. Instead of forcing an overclock, consider moving to a platform that supports your goals.
- Usage changes. If you need significantly more performance for tasks like streaming, video production, or machine learning, you may benefit more from a CPU with more cores or advanced instructions than from an overclocked mid‑range chip.
Turning Knowledge into Performance
Learning how to overclock the CPU opens the door to understanding your hardware and extracting more value from your system.
To recap:
- Overclocking means raising the CPU’s frequency and possibly the voltage to achieve better performance.
- Benefits include increased frame rates, faster render times, and delaying costly upgrades.
- Risks involve heat, reduced component lifespan, and system instability, but modern CPUs have safeguards if you proceed methodically.
- Preparation is critical. Invest in cooling, update your BIOS, and benchmark your system at stock settings.
- Overclock gradually: raise the multiplier by one, test stability, adjust voltage if needed, and document every step.
- Advanced techniques like per‑core tuning, base clock changes, and memory overclocking can yield further gains but require careful testing.
- Continuous monitoring and maintenance help keep an overclocked system running smoothly.
Overclocking isn’t mandatory for enjoying games or completing creative projects. Many of our best gaming CPUs deliver excellent performance at stock speeds, and upgrading to a newer chip might be the smarter move if your current processor struggles. Still, if you enjoy tinkering and have the right hardware, overclocking can be a satisfying way to personalize your PC’s performance.
FAQs
Yes, you can safely overclock a CPU by increasing clock speeds gradually and monitoring temperatures and voltages closely. Using proper cooling, staying within manufacturer‑recommended voltage limits, and testing each change ensures the process remains safe.
To overclock your CPU for gaming, start by establishing a baseline performance, then enter the BIOS and incrementally raise the CPU multiplier. After each adjustment, run gaming benchmarks or stress tests to verify stability and keep temperatures under control.
Yes, overclocking a CPU improves performance by allowing it to complete more operations per second. This results in faster processing in games and productivity tasks, provided the system remains stable and adequately cooled.
If you overclock a CPU too much, the system may crash, freeze, or fail to boot, and prolonged excessive voltage or heat can damage the processor. Symptoms like blue screens or random restarts indicate that you should reduce clock speed or voltage.
To reset a CPU overclock, enter the BIOS and load the default or optimized settings to revert all overclocking adjustments. If the system fails to boot, clear the CMOS using the motherboard jumper or button to restore factory defaults and regain stability.