


How to Unlock Terraforming in ACNH: Island Designer Guide for Animal Crossing New Horizons

Learning how to unlock terraforming in ACNH is a game‑changer for anyone who loves Animal Crossing: New Horizons. Terraforming lets you carve rivers, build cliffs, lay paths, and create waterfalls. It’s not available from the start; you’ll need to progress through the game, improve your island rating, and make Tom Nook proud before he hands over the Island Designer app.
I remember eagerly waiting for K.K. Slider to perform on my island, knowing that the concert meant I could finally reshape my island exactly how I wanted. In this guide, I’ll explain every requirement, share tips from my own playthrough, and help you transform your island into a personal paradise.
Jump to:
How to Unlock Terraforming in ACNH: Requirements and Steps
Unlocking terraforming hinges on earning the Island Designer app. Tom Nook gifts you this tool once your island reaches a three‑star rating and hosts K.K. Slider’s first concert. Here’s the streamlined roadmap:
- Upgrade Resident Services. During your first week, the Resident Services tent will evolve into a proper building. Pay off your initial debt, build Nook’s Cranny, and donate at least 15 critters to Blathers to unlock the museum. These projects trigger the upgrade.
- Complete Project K tasks. After the building is complete, Tom Nook starts Project K. He’ll ask you to:
- Build a campsite and invite the first camper to move in.
- Place three housing plots and craft furniture for each one.
- Recruit three new villagers. Each plot gets a new neighbor the day after you supply the requested items.
- Build a campsite and invite the first camper to move in.
- Reach a three‑star island rating. Isabelle at Resident Services evaluates your island on development (buildings, bridges, fences, villagers) and scenery (flowers, trees, furniture). When your island has at least eight villagers, enough decorations, and no clutter, she upgrades the rating. I spent a lot of time planting flowers and placing DIY furniture before she finally said K.K. would be interested.
- Host K.K. Slider’s concert. The day after your island reaches three stars, K.K. holds a live performance in your plaza. After the show, Tom Nook installs the Island Designer app on your Nook Phone, and you’re officially ready to terraform.
At first, the app offers only Grass and Dirt path tools. To fully reshape terrain, you’ll need additional permits and path types, which require Nook Miles. Don’t worry – below, I’ll explain how to earn those and use them effectively.
Achieving a Three‑Star Island: Preparation and Decorating Tips
Reaching three stars can feel daunting, but it becomes manageable once you know what Isabelle values. She scores your island based on development points (buildings, villagers, structures) and scenery points (plants, fences, furniture). Here are my strategies for hitting the threshold quickly:
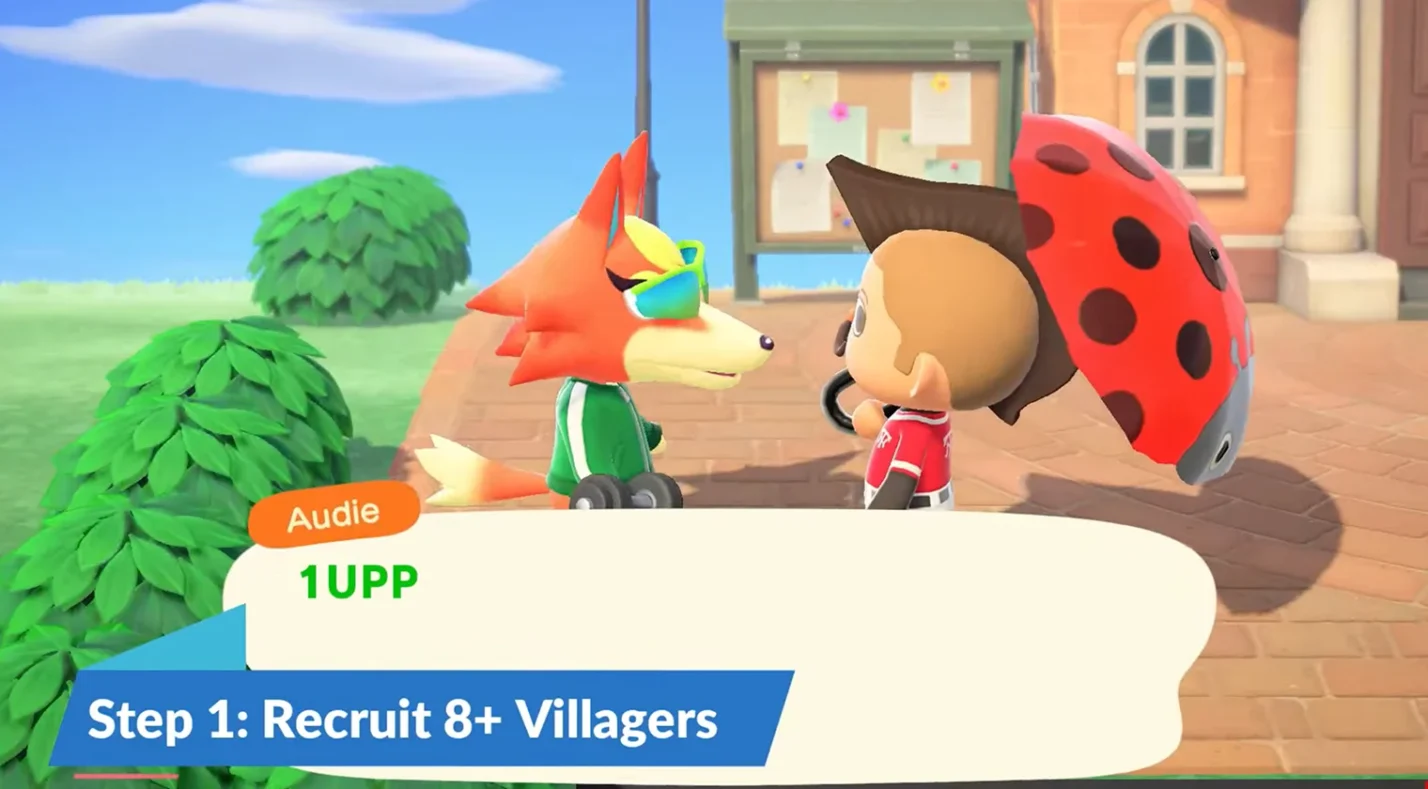
- Invite more villagers. A three‑star island needs at least eight residents. After the first five houses are built, speak to Tom Nook to sell more housing plots (10,000 Bells each) and visit Mystery Islands with Nook Miles Tickets to invite villagers. Nine or ten villagers will give you extra development points.
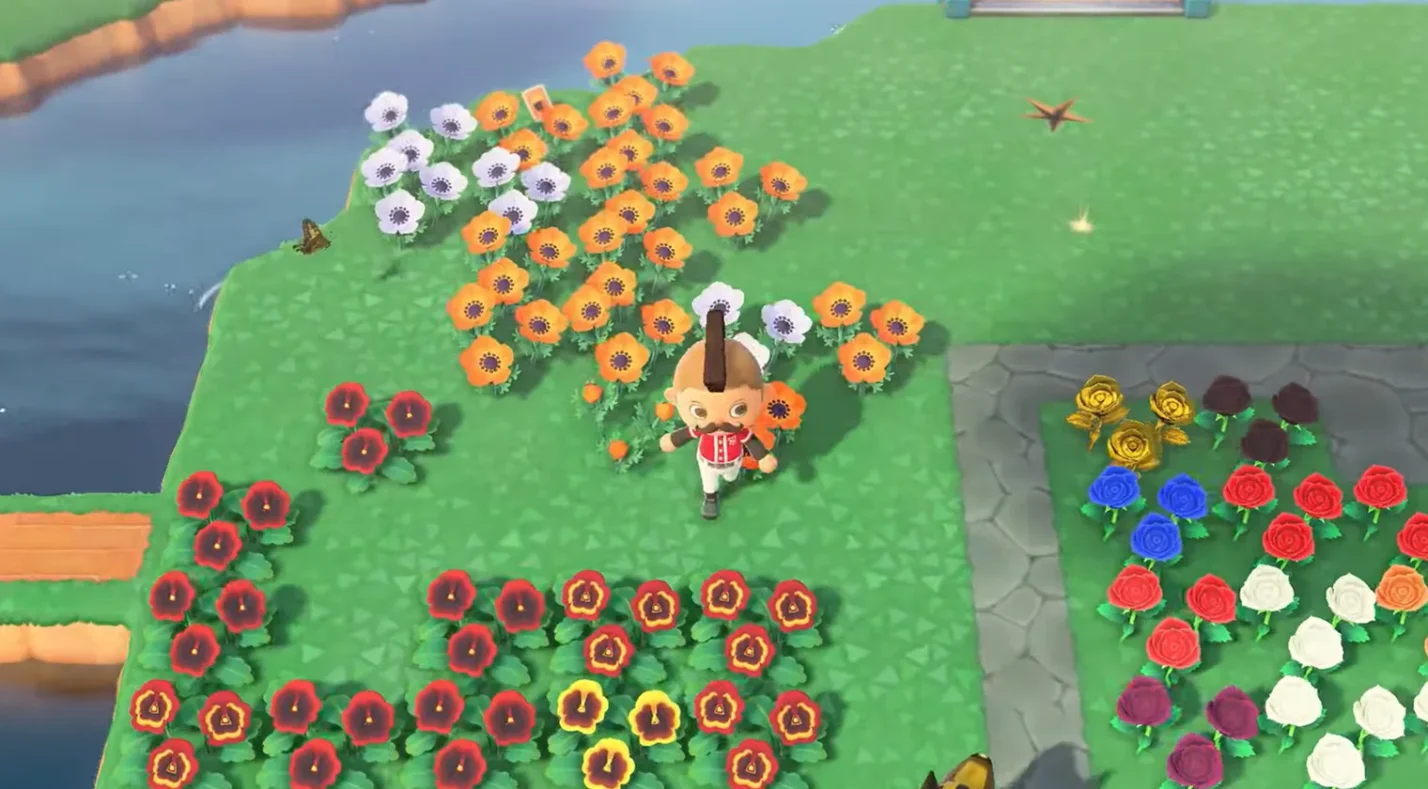
- Plant trees, flowers, and bushes. Adult flowers count as one scenery point each; buds and stems count less. Trees and bushes contribute as well, but avoid planting more than about 190; too many trees can cap your rating. I created orchards for each fruit type and scattered flowers throughout the island to keep things colorful.
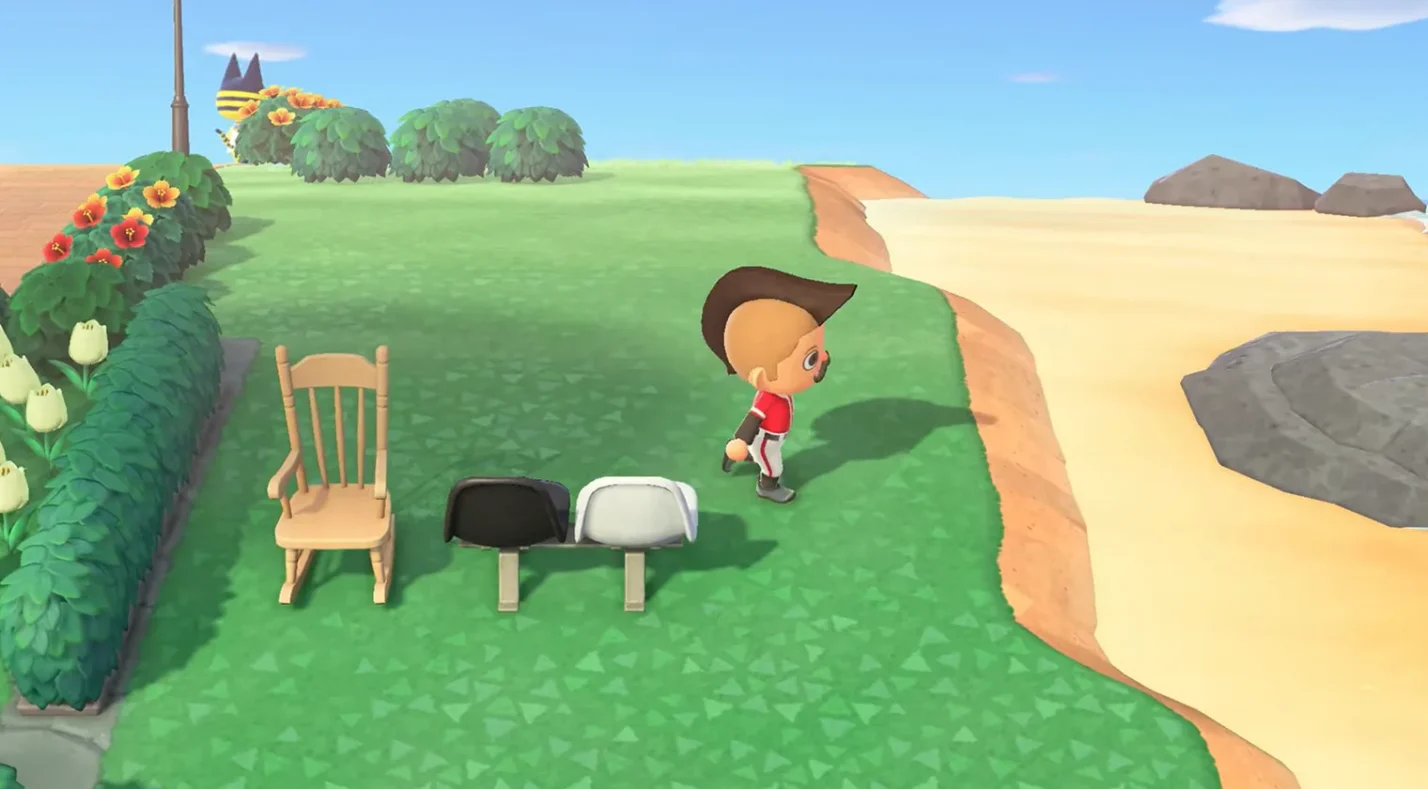
- Craft and place outdoor furniture. Furniture placed outdoors is scored in 8×8 blocks. Use a variety of DIY recipes and Nook Miles Rewards (like park benches and lamps) to earn more points. Avoid placing six or more identical items in the same area, as duplicates penalize your score.
- Fence off areas. Fences don’t just look nice; each segment provides development points. I fenced my villagers’ yards and garden plots, and Isabelle immediately praised the island’s organization.

- Build bridges and inclines. Each bridge or incline is worth 15 development points, so invest in at least two or three. Bridges also make it easier for villagers to reach new areas.

- Clean up clutter. Weed your island regularly; 100 or fewer weeds give you a development bonus. Pick up dropped items (tools, fruit, or crafting materials) and store them or display them on tables to avoid penalties.
- Upgrade shops. The museum, Nook’s Cranny, and Able Sisters contribute 15 points each. If you haven’t built Able Sisters yet, buy enough items from Mabel when she visits your plaza; she will eventually set up a permanent shop.
If you’re looking for other relaxing games to enjoy while waiting for villagers to move in, our best games like Animal Crossing article highlights cozy titles with similar design and farming elements. Spending time in those games often gave me new decorating ideas for my island.
Getting Started With the ACNH Island Designer App
Once Tom Nook installs the Island Designer app, open your Nook Phone and select the app to put on a hard hat – your signal that construction mode is active. Press + to cycle through available tools and A to apply them. The initial tools let you lay paths, but using them effectively takes some practice.
Path tools and types
- Grass and Dirt path are available immediately. Press A on a grassy tile to lay down a path; press again to round the edges; press a third time to remove it.
- To unlock more designs – Stone, Brick, Dark dirt, Arched tile, Sand, Terra‑cotta, Wooden, and Custom Design – visit the Nook Stop terminal in Resident Services. Each additional path style costs 2,000 Nook Miles, except for Custom Design path, which costs 2,300 Miles. After purchase, these appear in your Island Designer menu.
- Custom Design paths let you use any pattern from your Custom Designs app. Use them to create cobblestone roads, boardwalks, or city streets. You can layer custom paths over regular paths (if they contain transparent pixels) to get rounded edges.
I started by covering the plaza area with stone paths and built a wooden boardwalk leading to my beach. When mixing path types, remember that different styles don’t sit flush; you’ll see a thin line where they meet. Use custom designs to blend them together.
Basic controls and tips
- Shape your paths: To create circles, lay out a square of four tiles and press A again to round the corners. For hearts, expand to a 3×3 square and leave one corner empty before rounding the edges.
- Layering designs: If you edit a Custom Design, every path using that design will update automatically. Save backups of your favorite patterns before overwriting them.
- Remove carefully: Pressing A twice quickly removes a path tile. Avoid mashing buttons when working on narrow roads – you might delete more than intended.
For players seeking other calm titles with gentle gameplay loops, our guide to cozy Switch games can provide inspiration during your design breaks.
Unlocking Waterscaping and Cliff Construction Permits
Terraforming goes beyond paths. To sculpt rivers and cliffs you need the Waterscaping Permit and Cliff Construction Permit. Each permit costs 6,000 Nook Miles and is purchased from the Nook Stop once you have the Island Designer app.
Waterscaping
With the permit active, pressing A on a grass tile digs a small trench that fills with water; press again to widen or remove it. Use waterscaping to:
- Create or redirect rivers. Plan your waterways before digging. Rivers need to be at least three or four tiles wide for bridges and to make fishing easy. Keep a few natural‑width sections for spawning rare fish and leave cliff‑top rivers for mountain fish.
- Build ponds and lakes. Dig large basins, then round the edges by pressing A on the corners. Add tiny islands in the middle by leaving a single tile of land surrounded by water; they’re perfect for flower patches or decorative statues.
- Design waterfalls. Build a cliff two or three tiers high and then dig a tile of water on top to let water cascade down. You can stack waterfalls side by side for dramatic effect or lead them into small streams.
Take care not to block villagers’ routes. I once created a narrow river that only I could vault across, and soon found my villagers trapped on one side. Bridges solve this issue, but each one costs Bells, so plan accordingly.
Cliff construction
The Cliff Construction tool adds or removes one tile of cliff per press. You can build up to three tiers. Some pointers:
- Access: You need a ladder to climb cliffs until you build inclines. Villagers can only use inclines, so place them near high‑traffic areas.
- Spacing: You can’t build a new cliff directly adjacent to another; leave one tile between different tiers. Cliff edges round off automatically when you press A a second time on connected tiles.
- Stacking: Three tiers are the maximum height, and the top tier can’t have another level built on it. You also can’t modify the peninsula by the airport or certain building areas.
Cliff construction is perfect for creating terraced gardens, elevated neighborhoods, or natural‑looking mountains. I built a three‑tier waterfall area behind my house, complete with a hidden picnic spot.
If your family enjoys designing islands together or sharing a console, check out our picks for Nintendo Switch family games. They’re great for co‑op sessions when you need a break from solo terraforming.
Advanced Island Design and Customization Ideas
Once you’re comfortable with the tools, the only limit is your imagination. Here are some advanced ideas to take your island to the next level:
- Multi‑level neighborhoods. Build villages on different elevations. Use inclines and bridges to connect levels and add a sense of depth. Surround higher tiers with fences or hedges for safety.
- Themed areas. Design separate districts – like a zen garden, a bustling market, or a tropical resort. Change path styles and landscaping to suit each theme. Custom design codes can add rugs, stalls, or signage.
- Natural trails. Instead of rigid grids, lay winding dirt paths through wooded areas. Scatter weeds, shrubs, and log stools along the route. Add fallen leaves with custom designs for a seasonal feel.
- Orchards and farms. Plant fruit trees in neat rows and separate them with wooden paths. Use the terra‑cotta path to create a farmhouse aesthetic. Surround the area with a fence and place a scarecrow for extra charm.
- Secret beaches and coves. Sculpt cliffs around a secluded part of your beach, leaving only a narrow entry. Add a small pond, campfire, and hammock. It becomes a perfect place for your character to relax.
- Outdoor event spaces. Flatten a large area and create an outdoor café, concert venue, or wedding garden. Use custom designs for tables and stage rugs. Nook’s seasonal items like wedding decorations or festival balloons add flair.
- Star‑shaped lakes and heart ponds. Use waterscaping to carve shapes. Start with a basic outline, then round corners until the shape appears. Fill the center with flowers or place a decorative item on a tiny central island.
- Land bridges. Fill part of a river to create a one‑ or two‑tile crossing that your character can vault across. Land bridges provide unique ways to connect areas without building expensive bridges.
Experiment with combinations. In my current island, I have a tiered farm that feeds into a waterfall, which flows into a heart‑shaped pond by the campsite. It took planning and a few mistakes, but the end result feels cohesive and unique.
Earning Nook Miles and Upgrading Your Island Designer App
Nook Miles are the currency that fuels your terraforming ambitions. Beyond buying permits, you’ll use Miles for path styles, storage upgrades, and useful tools. Here’s how to earn and spend them wisely:
- Complete daily Nook Miles+ tasks. These mini‑challenges refresh throughout the day and reward 100–500 Miles each. Tasks range from catching fish and talking to villagers to selling items or customizing furniture. I check them whenever I log in and focus on easy ones for a quick boost.
- Achieve long‑term milestones. You’ll earn thousands of Miles for feats like catching every type of fish, filling your Critterpedia, or upgrading your house. Play at your own pace; these big payouts add up.
- Redeem useful upgrades first. Before splurging on path styles, purchase the Tool Ring (800 Miles) for quick access to tools and the Pocket Organization Guide (5,000 Miles) for more inventory space. Upgrading storage makes terraforming smoother because you can carry more materials and tools.
- Save for permits. Each waterscaping or cliff permit costs 6,000 Miles. If you’re eager to sculpt rivers and cliffs, prioritize these over cosmetic path styles.
- Buy Nook Miles Tickets occasionally. These tickets (2,000 Miles each) let you visit Mystery Islands where you can gather materials, farm iron nuggets, or recruit villagers. They’re invaluable when preparing for a three‑star upgrade.
A steady supply of Miles ensures you can unlock every path style and permit without grinding. Think of them as an investment in your island’s future appearance.
Essential Tools and Design Considerations
Terraforming introduces new freedom, but it also adds complexity. Keep these practical tips in mind:
- Carry a ladder and a vaulting pole. Until you build enough inclines and bridges, these tools are essential for moving around your changing landscape. Don’t accidentally trap yourself on a cliff without a ladder.
- Plan building relocations. You can’t terraform under or adjacent to buildings. If you want to reshape an area, you’ll need to pay Tom Nook to move houses or facilities (50,000–100,000 Bells). Relocate first, terraform second.
- Watch for rock and fossil spawns. Rocks and fossils appear only on grass or dirt. Covering your island entirely with paths or cliffs might reduce spawns. Leave some natural ground clear.
- Consider villagers’ paths. Villagers can’t vault rivers or climb cliffs without inclines. If you design narrow shortcuts, add bridges or inclines so villagers can reach shops and houses.
- Stay under tree limits. More than roughly 220 fully grown trees will trigger the “too rural” penalty, capping your island at four stars. Keep your forest areas balanced.
- Avoid clutter. Dropped items count as litter. Use outdoor storage options like tables or stalls to display items if you need them outside.
Taking time to plan before breaking ground will save Bells and frustration later.
Shape Your Dream Island With Terraforming
Mastering how to unlock terraforming in ACNH opens up endless possibilities. By upgrading Resident Services, completing Project K tasks, and crafting a three‑star island filled with villagers, flowers, fences, and furniture, you earn the Island Designer app. From there, using Nook Miles wisely lets you unlock path styles, waterscaping, and cliff construction. With patience and creativity, you’ll transform your island into a unique work of art.
If this guide has inspired you to start or revisit Animal Crossing: New Horizons, consider picking up our Animal Crossing: New Horizons (Nintendo Switch) eShop Key. Once you have your copy, jump in, earn those stars, and begin terraforming your dream island.
FAQs
How do I unlock terraforming in ACNH?
To unlock terraforming in ACNH, you must reach a three‑star island rating and host K.K. Slider’s concert. Tom Nook then gives you the Island Designer app so you can lay paths, shape rivers, and build cliffs.
How many stars do you need to terraform in Animal Crossing?
You need a three‑star rating to terraform in Animal Crossing: New Horizons. Achieving this rating requires at least eight villagers, plenty of decorations, and a clean island.
What are the requirements for the Island Designer app?
The requirements for the Island Designer app include upgrading Resident Services, building a campsite, inviting three new villagers, and reaching a three‑star island rating; once these are met, Tom Nook installs the app.
How do you get the waterscaping and cliff permits?
To get the waterscaping and cliff permits, redeem 6,000 Nook Miles for each permit at the Nook Stop after unlocking Island Designer; they allow you to reshape rivers and build or destroy cliffs.
How long does it take to unlock terraforming in ACNH?
It takes at least two weeks to unlock terraforming in ACNH because you need time to upgrade facilities, recruit villagers, and raise your island to a three‑star rating before K.K.’s concert.