



How to Overclock an NVIDIA GPU: A Gamer’s Guide to Safe Performance


Overclocking a graphics card means running it faster than the manufacturer’s default settings. When done carefully, it can unlock a few extra frames and smooth out performance in demanding games. I’ve been tinkering with GPUs since the days of the GeForce 8800, and I’ve learned that the process is a mix of science and art. In this guide, I’ll show you how to overclock an NVIDIA GPU, why silicon lottery matters, and how to decide if pushing your card makes sense for your system.
Jump to:
Understanding GPU Overclocking
Overclocking a GPU involves increasing its core and memory clock speeds beyond the factory-defined boost clock. When a graphics card’s core clock is raised, its processing units run faster, which boosts performance in games and rendering tasks. Raising the memory clock increases the bandwidth available to textures and frame buffers, which can be especially helpful in high‑resolution gaming. NVIDIA and other GPU manufacturers design cards with headroom for safe overclocks, but every chip is unique; this variance is known as the silicon lottery. Two identical graphics cards can have different ceilings even with the same cooling solution.
I often receive questions like “Does an overclock void my warranty?” The answer depends on the manufacturer. Most brands allow adjustments through software as long as you stay within driver‑provided limits. However, manually increasing voltage or flashing a modified BIOS can void support. Because of the silicon lottery, it’s important to approach each overclock gradually. Small increments help you find a stable overclock without stressing the card or forcing it to throttle. Pushing the clock speeds too far can lead to crashes, artifacts on screen, or long‑term instability.
GPU overclocking also influences power consumption and temperature. Raising the power limit allows the card to draw additional watts from your power supply unit (PSU), which is necessary for maintaining higher clock speeds. At the same time, a higher temperature target and fan speed setting ensure that the GPU does not overheat. Too much heat or insufficient power can cause the card to throttle back to lower clock speeds, negating the gains you’ve worked for. That’s why proper cooling and a quality PSU are prerequisites for any overclocking endeavor.
Preparing for the Overclocking Process
Successful overclocking starts long before you touch any sliders. First, evaluate your system. Do you have good airflow and a PSU with enough headroom? Most modern cards like the GeForce RTX 3060 or 4070 require at least a 600‑watt unit, but overclocking may require more. Cleaning dust from your case and adding an extra intake or exhaust fan helps maintain a stable temperature target. When I installed a second case fan, my GPU stayed about 5 °C cooler under load.
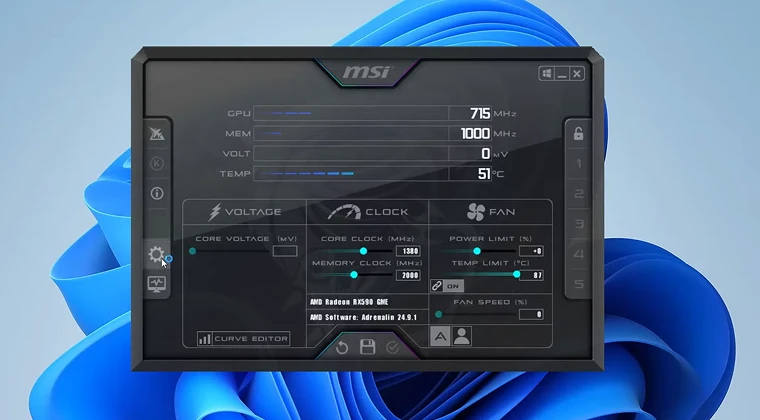
Next, update your GPU drivers and install trusted tools. MSI Afterburner is the most popular overclocking software because it supports cards from all brands and gives granular control over core clock, memory clock, voltage, fan speeds, and power limits. Alternatives include EVGA Precision X1, Asus GPU Tweak, or NVIDIA’s GeForce Experience tuning options. You’ll also need stress‑testing and benchmarking tools like Unigine Heaven, 3DMark, or FurMark. These programs push your GPU to its limits so you can verify stability and monitor temperatures. Don’t trust third‑party sites that promise miracle tuning utilities; using the official download pages from the software developers protects you from phishing or malware.
Before adjusting anything, benchmark your card at its stock settings. Launch your chosen stress test and record average frame rates, minimum frame rates, GPU utilization, and temperatures. It’s a good idea to test a game you play often, because some titles stress the GPU differently. In my case, I used Unigine Heaven and a session of Cyberpunk 2077 to capture baseline numbers. Keeping these results gives you a reference point to measure improvements and ensures that any performance gain is real rather than just luck.
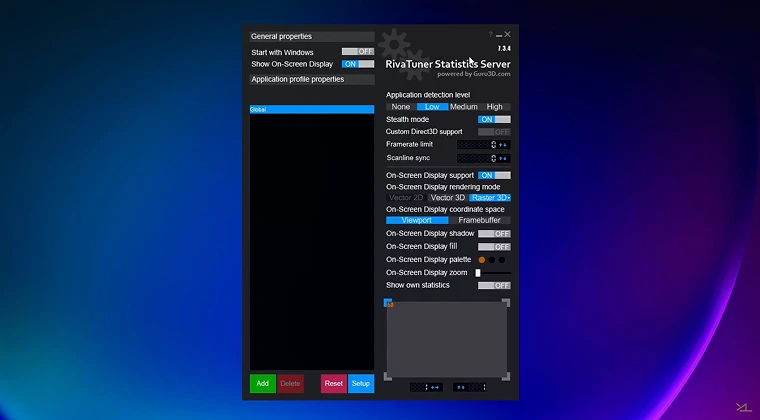
Proper monitoring makes all the difference. Tools like RivaTuner Statistics Server (bundled with MSI Afterburner) display real‑time FPS, core clock, memory clock, and temperatures on screen. If your GPU exceeds 85–90 °C, dial back the overclock or improve cooling. Watching these metrics during stress tests will help you catch issues before they lead to crashes. When I first overclocked my RTX 3060, I noticed that temperatures spiked when ambient room temperature went above 28 °C; opening a window or turning on air conditioning prevented throttling.
If you’re shopping for a display that lets your GPU’s extra frames shine, our overview of the best OLED gaming monitor reviews screens with fast refresh rates and vivid colors. A high‑refresh monitor pairs perfectly with a tuned GPU and helps you feel the difference between stock and overclocked performance.
Step‑by‑Step Guide to How to Overclock an NVIDIA GPU
Overclocking isn’t complicated, but the order of operations matters. Follow these steps to increase performance safely.
Step 1 – Maximize Power and Temperature Limits
Open MSI Afterburner and find the power limit and temperature limit sliders. Dragging the power limit slider to its maximum allows the card to draw more wattage from the PSU; this ensures that the GPU doesn’t throttle when you raise the clocks. Increasing the temperature limit lets the card boost longer before hitting a thermal ceiling. Apply these changes. On my card, setting the power limit from 100 % to 114 % provided extra headroom and raised the real‑world boost clock by around 120 MHz. Note that raising the power limit will increase electricity usage and heat output, so monitor temperatures closely.
Step 2 – Tweak Fan Speeds
Cooling is critical, especially once you start increasing clock speeds. Most overclocking software allows you to set a custom fan curve. A fan curve defines how fast the fans spin at various temperatures. I like to set a slightly more aggressive curve; for example, ramping the fans to 60 % at 70 °C instead of the default 50 %. The extra noise is worth the stability. If you’re using a dual‑fan card in a small case, consider leaving the side panel open during testing or adding case fans to reduce internal temperatures. Always ensure there is adequate airflow around the GPU.
Step 3 – Increase Core Clock in Small Increments
The core clock drives the GPU’s processing units. Start by raising the core clock by a modest amount, around 50 MHz. Click Apply and run a stress test or a demanding game for at least ten minutes. Look for artifacts such as flashing pixels, shimmering textures, or driver crashes. If everything is stable, increase the core clock by another 25 or 50 MHz and test again. The +100 MHz offset is often achievable on many RTX cards, but each unit varies. When I overclocked my RTX 3060, I found that +125 MHz caused crashes, while +100 MHz ran flawlessly.
If you prefer automation, some tools offer an OC Scanner or auto‑tuning function. These utilities run stress tests and determine a safe core clock automatically. However, automatic tuning may miss potential performance; manual adjustments often yield a better balance.
Step 4 – Increase Memory Clock Separately
Memory bandwidth plays a huge role in modern games. After finding a stable core clock, return the core clock slider to zero and focus on the memory clock. Increase the memory by roughly 10 % or 50–100 MHz at a time. Test for stability after each change. Some GPUs can handle large memory overclocks; others may only handle small adjustments. During my tests, my card handled a +750 MHz memory offset without issues, but crashed at +1000 MHz. If your stress test or game freezes, restart the PC and lower the memory clock slightly.
Step 5 – Combine and Fine‑Tune
Once you know your maximum stable core and memory clocks separately, combine them. Set the core clock offset and memory clock offset to the values that were stable individually. Run another stress test and play a few games. If you encounter crashes or artifacts, dial back one of the clocks by 10–20 MHz until stability returns. Fine‑tuning is where patience pays off. According to the AVG guide, slowly increasing the overclock by 10 MHz increments and testing each time helps you avoid running into a wall. When I found the sweet spot of +100 MHz core and +750 MHz memory, my GPU temperature stayed under 80 °C, and I gained about 8 % more frames in Borderlands 3.
Step 6 – Stress Test for Longer Sessions
Short stress tests catch obvious crashes, but extended gaming sessions reveal subtler instability. Once your overclock passes a 15‑minute test, run a benchmark for an hour or play a demanding game for a few hours. Monitor temperatures, fan noise, and clock speeds. If you see a drop in performance or the system freezes after an hour, reduce the overclock slightly. Some cards exhibit issues only after they heat soak fully. Running extended tests ensures that your stable overclock is truly stable over time.
Step 7 – Save Profiles and Create Game‑Specific Settings
Most tuning tools allow you to save your overclock settings as profiles. Save a “Balanced” profile with moderate overclocking for everyday gaming and a “Max” profile for competitive matches where every frame counts. Asus’ GPU Tweak III even lets you assign profiles to specific games. This way, you can push the card harder in esports titles and keep noise down in narrative games.
Step 8 – Understand the Risks and When to Stop
Overclocking comes with risks. Pushing voltage too high can degrade hardware over time, and running at the edge of stability may lead to frequent crashes. Never increase voltage beyond what your card’s cooler can handle. Avoid applying both high core and memory overclocks at once without testing, and always keep a copy of your default settings so you can return to them. Remember, the silicon lottery means results will vary. Your friend’s card may handle a +200 MHz core overclock, while yours might top out at +100 MHz.
Avoiding Common Overclocking Mistakes
Many first‑time overclockers rush the process. Here are pitfalls to avoid:
- Skipping baseline tests: Without a stock benchmark, you won’t know if your changes improved performance or made things worse. Always start with default settings.
- Raising voltage unnecessarily: Voltage increases generate more heat and stress components. With modern GPUs, sticking to the default voltage and maximizing the power limit often yields similar results.
- Ignoring cooling: Overclocking increases power consumption, which increases heat. Poor case airflow causes the GPU to throttle. Ensure fans are clean and consider adding intake and exhaust fans.
- Overclocking everything at once: Increase the core clock and memory clock separately. If you adjust them simultaneously and experience crashes, you won’t know which clock caused the issue.
- Copying someone else’s settings: Even if you have the same model, your card’s silicon quality may differ. Use other people’s numbers as a starting point, but always test your own card to find stable values.
- Expecting huge gains: Overclocking typically improves performance by 5–15 %. If you need a 30 % boost to meet your target FPS, consider upgrading your GPU instead.
Choosing Between Overclocking and Upgrading
Overclocking makes sense when you want a modest boost and have the patience to test thoroughly. It’s ideal for extending the life of an older card or squeezing out a few more months before upgrading. When I moved from a GTX 1070 to an RTX 3060, I overclocked the 1070 to keep games playable at 1440p until new cards became affordable. The performance gain was enough to play titles like Apex Legends smoothly.
However, overclocking cannot magically turn a mid‑range card into a high‑end powerhouse. If you’re consistently dropping below 60 FPS at your desired resolution even after a careful overclock, it may be time to upgrade.
Our comparison of the best GPUs for gaming reviews the latest options from NVIDIA, AMD, and Intel. It highlights cards that offer excellent gaming performance and energy efficiency at different price points. Upgrading to a new graphics card can provide a 50 % or greater performance increase over older models, which is far beyond what overclocking can achieve.
Multi‑GPU and Efficiency Considerations
Although multi‑GPU setups such as SLI or NVLink are rare today, some enthusiasts still run dual GPUs for rendering or legacy games. Each card in an SLI setup must be overclocked separately, and stability on one card does not guarantee stability on the other. Start by overclocking the primary card while leaving the second at stock settings. Once you find a stable configuration, replicate it on the second GPU. Ensure your PSU can handle the combined power draw and that your case has enough airflow for the additional heat.
Efficiency is just as important as raw performance. Adjusting your overclock to reduce voltage or using an undervolt can lower power consumption and fan noise while maintaining high clocks. For example, I lowered my RTX 3060’s voltage curve to maintain a 1900 MHz core clock at slightly lower voltage, which reduced temperatures by 4 °C and quieted the fans. Tools like MSI Afterburner allow voltage control; however, this feature may be locked on some cards by default. If voltage control is available, adjust in small increments and test stability. The goal is to find the lowest voltage that maintains your desired clock speeds.
Final Thoughts on Overclocking an NVIDIA GPU
Learning how to overclock an NVIDIA GPU is a must if you want to get the most out of your gaming sessions. It teaches you about hardware limitations, cooling, and the trade‑offs between performance and noise. Make sure to follow a structured approach, establish a baseline, increase the power and temperature limits, gradually raise the core and memory clocks, and stress test for stability. Remember that gains are modest and vary depending on the individual GPU, so temper expectations and be prepared to upgrade if necessary.
Once you’ve dialed in a stable overclock, reward your GPU by throwing a demanding game at it. Few titles showcase the benefits of overclocking better than Cyberpunk 2077, which pairs detailed environments with intense action. Our digital key for Cyberpunk 2077: Ultimate Edition (PC) lets you experience the neon‑soaked streets of Night City without paying full price. With your tuned NVIDIA GPU, you’ll enjoy smoother frame rates and a more immersive gaming experience.
FAQs
How do I overclock my NVIDIA GPU step by step?
To overclock your NVIDIA GPU step by step, begin by increasing the power and temperature limits, then adjust the fan curve for better cooling. Raise the core clock in small increments, test for stability with a stress test, and repeat until you encounter instability. After finding a stable core offset, do the same with the memory clock. Finally, combine the two overclocks, run extended tests, and save your settings as a profile for easy switching.
Is it safe to overclock an NVIDIA GPU?
Yes, it is safe to overclock an NVIDIA GPU as long as you stay within software‑imposed limits and monitor temperatures. NVIDIA cards include protections that throttle performance if temperatures or power draw become excessive. Avoid raising voltage unnecessarily and test each change thoroughly; this way, you maintain stability and protect your hardware.
Does overclocking a GPU increase FPS?
Overclocking a GPU increases FPS by boosting the clock speeds of the core and memory, which improves rendering performance. In most cases, the gain ranges from 5 % to 15 %, so you may notice smoother gameplay and higher minimum frame rates, but don’t expect a complete transformation.
Do I need to overclock my GPU for gaming?
No, you do not need to overclock your GPU for gaming if your current card meets your desired performance levels. Overclocking is optional and primarily benefits users who want to squeeze extra performance from existing hardware. Many modern GPUs perform well enough at stock settings for 1080p or 1440p gaming.
Can I overclock my GPU with GeForce Experience?
Yes, you can overclock your GPU with GeForce Experience by using the auto‑tuning feature found in the Performance tab. The tool scans your graphics card and applies a modest overclock automatically. While convenient, manual tuning often yields better results, so enthusiasts prefer tools like MSI Afterburner for full control.