How to Access BIOS: A Complete Guide for Gamers and PC Users

Learning how to access BIOS is one of those basic skills every gamer and PC enthusiast needs. The BIOS (Basic Input/Output System) is the low-level firmware that runs before your operating system boots. It checks your hardware, sets up communication between components, and hands control over to Windows or another OS. Without BIOS, your machine wouldn’t even know where to start.
Knowing how to access BIOS means you can control things like boot order, overclocking, power management, and security settings. For gamers, it’s often where you enable features like XMP profiles for RAM or adjust fan speeds for better cooling. While the idea may sound intimidating if you’ve never done it before, the process itself is simple once you know the right steps.
Jump to:
What Is BIOS and Why It Matters
BIOS is essentially the link between your computer’s hardware and software. It’s stored on a chip on your motherboard and initializes everything when you press the power button. Over the years, BIOS has evolved into UEFI (Unified Extensible Firmware Interface), which looks more modern and supports more features, but most people still call it BIOS.
For everyday users, you may never need to open BIOS. But for gamers, system builders, and anyone who tweaks their setup, it’s an essential tool. If your PC won’t boot, your new SSD isn’t being recognized, or you’re installing a fresh OS, the BIOS is where you’ll go first. I’ve personally had situations where my new top-tier GPU for gaming wouldn’t show up until I double-checked settings here.
Common Keys to Access BIOS
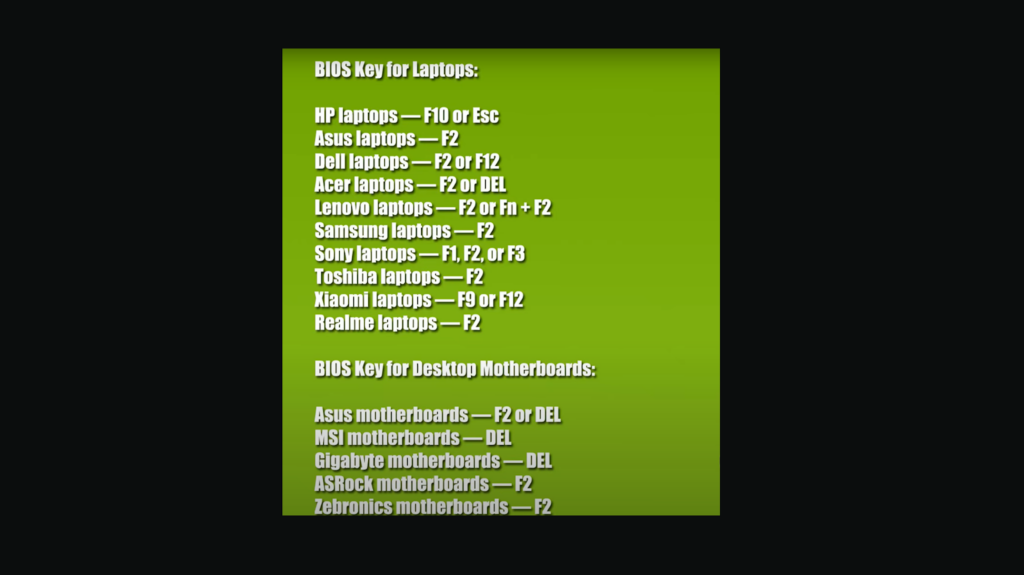
The most common way to access BIOS is by pressing a specific key during startup. These keys include F2, F10, F12, Esc, or Delete. Which one you need depends on your device’s manufacturer. For example:
- ASUS and MSI motherboards often use the Delete key.
- Dell and Lenovo laptops commonly use F2.
HP laptops usually use Esc or F10. - Acer laptops often rely on F2.
When you power on your device, you’ll usually see a brief splash screen with instructions like “Press F2 to enter Setup.” The tricky part is timing. On systems with fast boot enabled, the startup screen flashes by so quickly you barely have a second to hit the key. I’ve had plenty of mornings where I had to restart three or four times before nailing the timing.
How to Access BIOS on Windows PCs
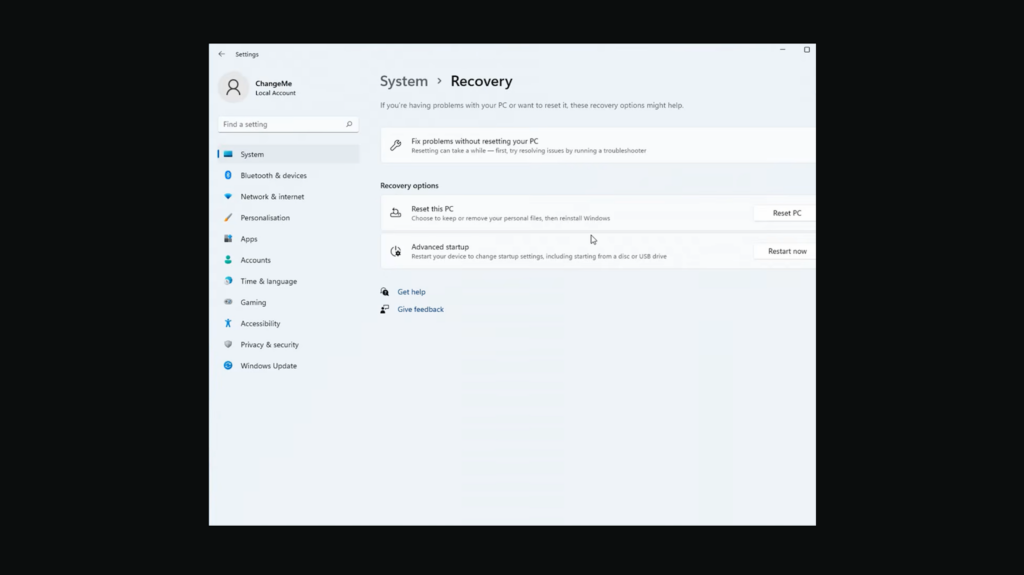
If you’re running Windows 10 or 11, you don’t have to rely only on hitting the right key during startup. Microsoft built a way to reboot directly into BIOS through system settings. Here’s how to do it:
- Open Settings.
- Go to Update & Security (Windows 10) or System > Recovery (Windows 11).
- Under Advanced Startup, click Restart now.
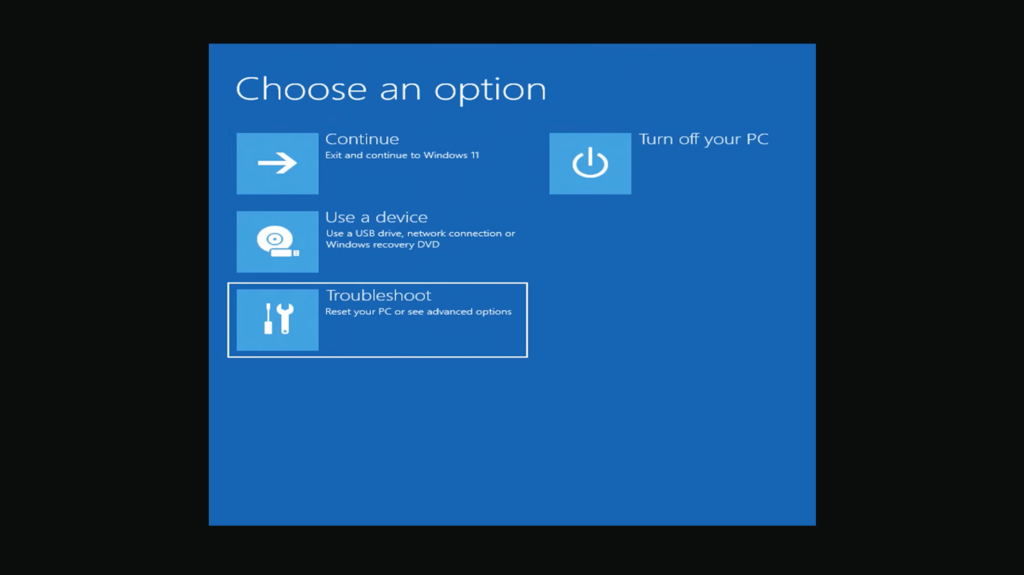
- When your PC reboots, select Troubleshoot > Advanced Options > UEFI Firmware Settings.
- Hit Restart, and your PC will boot straight into BIOS.
This method is especially handy if you’re using a modern gaming laptop or desktop PC with ultra-fast boot times that skip the splash screen. It’s a guaranteed way to get in, no matter how quick your hardware is.
How to Access BIOS on Laptops
Laptops can be a little trickier because manufacturers like to use their own shortcuts. Here are the common keys for some major brands:
- HP – Esc or F10
- Lenovo – F1 or F2
- Dell – F2
- Acer – F2
- ASUS – F2 or Delete
- Samsung – F2
- Toshiba – F2 or F12
On some hi-end Lenovo gaming laptops, there’s even a tiny button next to the power input called the “Novo” button. Pressing it while the laptop is off brings up a boot menu with the BIOS option. I once had to help a friend figure this out because he didn’t realize that tiny hole next to the charging port was actually a button.
If you’re unsure which key works for your laptop, check the manual or the support page for your brand. It saves a lot of trial and error.
Adjusting Settings After Accessing BIOS
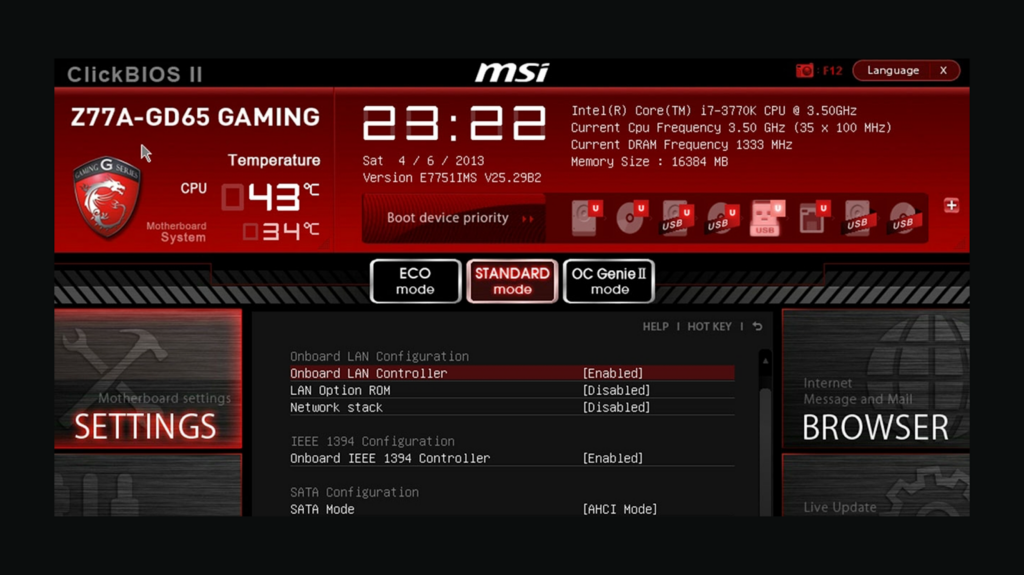
Once you’re inside BIOS, you’ll see a menu-based interface. UEFI versions even come with mouse support and a more modern look. Here are the most common things gamers adjust:
- Boot Order: Choose which drive your system loads first. Useful if you’re installing a new OS from USB.
- XMP Profiles: Enable higher RAM speeds beyond default settings.
- Fan Control: Adjust cooling performance to keep temps down while gaming.
- Overclocking Options: Fine-tune CPU and GPU performance (if supported).
- Secure Boot: Manage system security features.
These menus differ depending on the manufacturer, but the layout is generally straightforward. I usually recommend only adjusting one setting at a time. That way, if something goes wrong, you know exactly what caused the issue.
Troubleshooting BIOS Access Problems
Sometimes, no matter what you try, you can’t seem to get into BIOS. The most common reasons include:
- Fast Boot Enabled: This skips the key-press window. Use Windows settings instead.
- Wireless Keyboards: On older systems, USB keyboards might not register early enough in the boot process. Try a wired keyboard.
- Wrong Key Pressed: Double-check your manufacturer’s guide.
- Corrupt BIOS: Rare, but if your system is unstable, you might need a BIOS reset or update.
If all else fails, you can clear your CMOS (done by pressing a reset button on your motherboard or removing the battery for a few minutes). I’ve had to do this once when a failed overclock locked me out. It’s not as scary as it sounds, but do it carefully.
Why BIOS Access Matters for Gamers
For gamers, BIOS isn’t just some hidden menu. It’s the control panel that unlocks your system’s full potential. You can improve loading speeds, get better stability, and even extend hardware lifespan by managing temperatures correctly.
When I built my first PC, enabling XMP in BIOS boosted my RAM speed instantly, which made a noticeable difference in loading large games. That one adjustment alone showed me why knowing how to access BIOS matters.
Level Up With the Right Games
Mastering BIOS is just one step in making sure your gaming rig is running at its best. Once your system is optimized, the next step is putting it to the test with games that truly push your hardware. Check out our collection of great PC games on Eneba and grab a new title to see what your machine can really do.
FAQs
How do I access BIOS on Windows 11?
To access BIOS on Windows 11, go to Settings, then System > Recovery, and restart into Advanced Startup. From there, select Troubleshoot > Advanced Options > UEFI Firmware Settings to enter BIOS.
What key should I press to enter BIOS?
The key you should press to enter BIOS is usually F2, F10, F12, Esc, or Delete. The exact key depends on your PC or laptop manufacturer.
Can I access BIOS without restarting?
No, you cannot access BIOS without restarting. BIOS runs before the operating system loads, so a reboot is required to enter it.
How do I reset BIOS to default settings?
To reset BIOS to default settings, enter BIOS and look for the option called “Load Setup Defaults” or “Restore Defaults.” Selecting it will reset everything to factory configuration.
Why can’t I access BIOS on my PC?
The reason why you can’t access BIOS on your PC is usually because fast boot is enabled or the wrong key is being pressed. Try using Windows settings or repeatedly tapping the correct key during startup.