BG3 Adamantine Forge Items: How to Craft, Choose, and Master Act 1’s Legendary Gear


Crafting Adamantine gear is one of the most exciting early challenges in Baldur’s Gate 3, but it’s also a resource‑limited puzzle that can make or break your Act 1 power curve. With only two pieces of mithral ore in the Grymforge and six possible items to make, choosing what to craft at the legendary forge is a critical decision.
To help you make the most of your limited mithral supply, this guide covers how to access the forge, how crafting works, what each adamantine item offers, and which combinations are worth the investment. I’ve also linked to some of our other guides on Baldur’s Gate 3 to help you tackle related quests.
Jump to:
BG3 Adamantine Forge Items: Overview and What They Offer
The Adamantine Forge lies deep in the Underdark and can only be used twice in a playthrough. Six BG3 adamantine forge items are available:
- three weapons (longsword, scimitar, and mace),
- two armors (scale mail and splint armour), and
- a shield.
Each forged item requires one mithral ore and the matching mould. All items share key traits: attackers who hit you become Reeling, imposing a –1 penalty to their attack rolls for several turns, and critical hits against the wearer are negated. Because mithral ore is scarce and each item offers unique benefits, understanding its properties upfront helps you decide which to craft.
The weapons – adamantine longsword, scimitar, and mace – feature the Diamondsbane trait, which turns attacks against objects into automatic critical hits, and the Lethal Weapon trait, which bypasses certain resistances. These weapons deal solid damage and apply the Reeling effect on hit, plus they can break objects, but other Act 2 gear soon outshines them.
The shield and armor, by contrast, provide long‑term defensive advantages: immunity to critical hits, reduction of incoming damage by one or two points, and the ability to send attackers reeling. For most parties, this makes the armor and shield the highest-priority forged items.
Reaching the Adamantine Forge and Collecting Materials
Finding the forge

To reach the forge you must venture into Grymforge, an underground zone accessible from the Underdark Beach. After taking the Duergar boat and activating the Waypoint, climb the stairs and head north until you meet a group of duergar and Rothé blocking a passage.
You can persuade the Rothé to clear the debris or blast the rocks with explosives. Beyond the cave‑in are a series of platforms operated by levers and an iron ladder. Use ranged attacks or Mage Hand to hit the levers. This raises and moves the platforms so your party can cross. Remember to grab the longsword mould on the first walkway – moulds often lie on corpses near these mechanisms.
Gathering moulds and mithral ore
There are six moulds in total, all found near the forge. They correspond to the longsword, mace, scimitar, shield, scale mail and splint armor. The shield mould is inside the Dormitory behind locked doors at the start of the walkway. The scale mail mould lies southwest of the Ancient Forge Waypoint, guarded by animated armors. The scimitar mould sits next to the shootable levers on the final moving platform, and the splint mould is northeast of the waypoint up the stairs. Pick them all up before crafting so you have the freedom to choose later.
Mithral ore is even scarcer. Only two veins exist near the forge. One is halfway down the stairs to the forge; jump over the lava, defeat the Magma Mephits and smash the glowing blue vein with a bludgeoning weapon. The other ore deposit lies past the animated armor to the southwest; follow the lava pools and break the glowing vein. Because each forged item consumes one ore, you can only craft two pieces per playthrough. Plan accordingly.

Activating the forge
Once you have a mould and mithral ore, descend to the forge chamber. It has several interactive parts: the Mould Chamber (a mechanical arm), the Crucible (central pillar), a Forge Lever on the southern side, and a Lava Valve on the east. To craft an item:
1. Insert your chosen mould into the Mould Chamber.
2. Place one mithral ore into the Crucible.
3. Pull the Forge Lever to lower the platform and hammer.
4. Open the Lava Valve to flood the channels with lava. This step is crucial – without lava, the guardian construct, Grym, is impervious to damage.
5. If this is your first time, Grym will appear. Defeat him (see below). Afterwards, pull the lever again to finish forging and collect your item.
6. Use the Mould Ejection Lever to retrieve the mould for future use.
Defeating Grym

Grym is a Level 8 construct with about 300 health that guards the forge. He is immune or resistant to all damage types unless superheated by lava. To defeat him efficiently:
· Superheat him by keeping the lava flowing. When Grym steps into lava, he becomes vulnerable to bludgeoning damage. Assign one character to stand near the lava valve and reopen it every few turns so the construct stays hot.
· Use bludgeoning weapons or the forge hammer. Grym takes double damage from bludgeoning attacks while superheated. Warhammers, maces and the massive forge hammer all qualify. You can lure Grym under the hammer and pull the Forge Lever to slam it down, dealing over a hundred damage.
· Manage positioning. Grym targets the last character who damaged him, so spread your party across the four corners of the forge to control his movement. Avoid standing in lava channels to prevent severe burning.
When Grym falls, he drops the Grymskull Helm, a heavy helmet that grants fire resistance and prevents critical hits. After this battle, the forge can be used without additional fights.
BG3 Adamantine Forge Items: Detailed Breakdown
Adamantine Splint Armour (Heavy)
The Adamantine Splint Armour is the heaviest forged item and arguably the best defensive option. It has a base Armor Class (AC) of 18 and counts as heavy armour. Special traits include:
· Magical Plate: All incoming damage, physical and magical, is reduced by 2.
· Intense Adamantine Backlash: When an enemy lands a melee hit, they gain the Reeling debuff for three turns, lowering their attack rolls.
· Critical immunity: Critical hits against the wearer become normal hits.
This armour suits fighters, paladins and clerics who can wear heavy armour. The drawback is a disadvantage on stealth checks and a heavy weight that slows movement. In my first run I outfitted Lae’zel with the splint armor and shield; she became nearly unkillable in Act 1 boss fights because most enemies could not land a crit and their attacks were penalised.
Adamantine Scale Mail (Medium)
If your party lacks heavy armour proficiency, Adamantine Scale Mail offers a solid alternative. It provides AC 16 with up to +2 from Dexterity. Its properties include:
· Magical Plate: Reduces all incoming damage by 1.
· Adamantine Backlash: When hit by a melee attack, the attacker becomes reeling for two turns.
· Critical immunity: Prevents critical hits.
Scale mail is ideal for rangers and clerics who need more durability without sacrificing Dexterity. However, like splint armour, it carries a stealth disadvantage. From experience, Shadowheart wore this armor through the endgame because even Act 3 enemies rarely break through its damage reduction.
Adamantine Shield (Shield)
The Adamantine Shield is versatile because any class proficient with shields can wield it. Its features are:
· +2 AC bonus and critical hit immunity.
· Shield Bash reaction: When an attacker lands a melee hit, you can use a reaction to knock them prone if they fail a Dexterity saving throw.
· Adamantine Shield effect: When a melee attack misses you, the attacker gains the Reeling debuff for two turns.
The shield works well with both heavy and medium armour and even some spellcasters. If you choose not to craft an armour piece, pairing the shield with a weapon can still deliver strong defensive value.
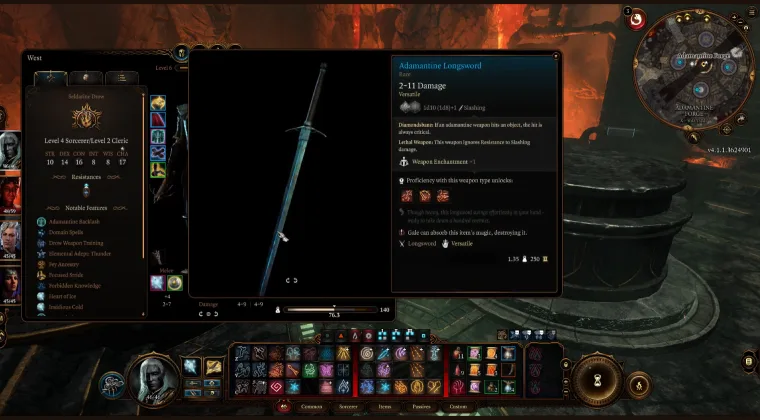
Adamantine Longsword (Weapon)
The Adamantine Longsword is the most potent weapon from the forge. It deals 1d8+1 slashing damage one‑handed or 1d10+1 two‑handed. Important traits include:
· Diamondsbane: All attacks against objects automatically become critical hits.
· Lethal Weapon: Ignores resistance to slashing damage.
· Reeling debuff: Successful one‑handed hits impose Reeling for one turn; two‑handed hits impose Reeling for two turns.
· Versatile: Can be wielded one‑ or two‑handed, and it provides access to Lacerate, Pommel Strike and Rush Attack.
Although the longsword is a solid damage dealer, many Act 2 weapons surpass it. If your party is struggling to find a decent melee weapon in Act 1, consider crafting it; otherwise, save your ore for armour.
Adamantine Scimitar (Weapon)
The Adamantine Scimitar is a finesse weapon that deals 1d6+1 slashing damage and can be dual‑wielded. Its traits mirror the longsword – Diamondsbane, Lethal Weapon and a Reeling effect – but last only one turn. Because you can only craft two items, investing precious ore in a weapon that will soon be outclassed is rarely wise. Dual‑wielding rogues or rangers might appreciate the scimitar early on, but there are numerous light weapons later in the game. Use this mould only if you have a specific build that benefits from finesse and offhand versatility.
Adamantine Mace (Weapon)
The Adamantine Mace deals 1d6+1 bludgeoning damage and features the same Diamondsbane and Lethal Weapon traits. Unique to the mace is the Concussive Smash attack, which can potentially daze enemies. It also ignores bludgeoning resistance.
However, the mace’s small damage die and lack of special attacks make it underwhelming for most martials. Some players use it as a tool for breaking obstacles rather than a primary weapon. Unless you’re role‑playing a cleric who wants a bludgeoning weapon, it’s better to spend your ore on armour.
Grymskull Helm (Loot)
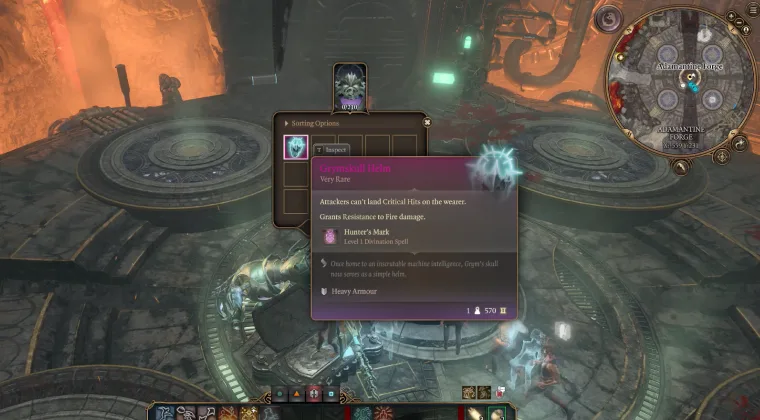
The Grymskull Helm is a bonus reward dropped by Grym rather than a forged item. It counts as heavy armour and grants:
· Resistance to fire damage.
· Critical hit immunity.
· Free use of the Hunter’s Mark spell.
Because it doesn’t grant AC and requires heavy armour proficiency, only a few characters benefit from it. Still, its fire resistance and crit immunity make it an attractive headpiece for tanky front‑liners.
Choosing the Best Adamantine Forge Items for Your Party
With only two mithral ores available, deciding which items to forge is the most important part of using the forge. Here are a few considerations:
- Party composition and proficiencies: Heavy armour wearers (fighters, paladins, war clerics) shine with the Splint Armour. If your party lacks heavy proficiency, choose Scale Mail for rangers or clerics. The shield suits almost any class with shield proficiency and pairs nicely with medium armour.
- Damage reduction vs. utility: Both armours reduce all incoming damage – two points for splint and one point for scale mail. This reduction stacks with normal AC and can negate chip damage from most enemies, making long fights easier. The shield provides reeling and a knock‑prone reaction but does not reduce damage.
- Class features and restrictions: Some classes, like barbarians, cannot rage while wearing heavy armour, so giving them splint armour wastes a core ability. Rogues and monks rely on stealth or unarmored defenses, making heavy gear undesirable. Medium armour offers a compromise for these classes.
- Future weapon upgrades: Act 2 and Act 3 offer superior weapons with elemental damage, crowd control, or unique procs. Forged weapons may feel underpowered compared to loot found later. If your protagonist already wields a solid magical weapon, skip forging a weapon and invest in armour and shield.
In my second playthrough I crafted the scale mail for Shadowheart and the splint armour for Lae’zel. The damage reduction and crit immunity allowed them to tank bosses such as Nere and Orin with ease. I regretted not crafting the shield, however, because it would have helped Gale survive stray arrows and maintain concentration on spells. This personal experience highlights that there’s no universally “right” choice – your decision should reflect your party’s needs and playstyle.
Timing and strategy
Consider clearing Grym early so you have your first adamantine gear during key Act 1 encounters. However, don’t rush to craft immediately: explore Grymforge thoroughly to collect all moulds and both ores first. That way you can make an informed decision instead of committing to the first mould you find. After forging your first item, return later for your second craft when you have a clearer sense of your party’s strengths and weaknesses.
For players seeking more adventures within Baldur’s Gate 3, our article on He Who Was explores the moral choices in the “Punish the Wicked” quest and offers tips for managing companion approval.
If you enjoy solving puzzles like those in the Grymforge, see What Can Silence the Nightsong? for a detailed walkthrough of the Silent Library and the rewards it hides.
And if you’re already thinking ahead to other epic adventures, check out our list of games like Baldur’s Gate 3 for recommendations on other isometric RPGs you’ll love. These guides can enrich your journey and help you make smart decisions across Faerûn.
Tips for Maximizing Forge Rewards and Surviving the Fight
· Un-group your party before pulling the forge lever so each character can take up a corner. This prevents Grym from downing multiple characters with area attacks.
· Keep the lava flowing. If the lava drains, Grym gains resistance to all damage and the fight drags on. Assign one character to operate the lava valve; turn it on again as soon as the channels empty.
· Use bludgeoning weapons like warhammers or clubs when Grym is superheated to maximise damage. If you don’t have any, look around the forge area for crates or improvised weapons.
· Attack from range to trigger the lever. You can pull the forge lever with a bow, crossbow or cantrip, keeping your character out of melee range.
· Loot Grym’s corpse after the fight. The Grymskull Helm provides crit immunity and fire resistance. Even if you don’t wear it, you can sell it for gold.
· Remove the core from your power armour (if using mods) or from other equipment when not in use to prevent unintended consumption – a lesson learned from running out of fuel mid-fight in my first playthrough.
Forge Your Destiny in Faerûn
The Adamantine Forge is more than a crafting station; it’s a test of resource management and strategic thinking. With only two pieces of mithral ore to spend on six BG3 adamantine forge items, you must weigh the needs of your party against the allure of shiny weapons.
For most players, prioritising the scale mail or splint armour and complementing them with the shield provides the best return on investment, reducing incoming damage and negating critical hits throughout the game. Weapons can still be fun, but they are quickly outmatched by Act 2 loot.
This decision‑making process mirrors the many choices that make Baldur’s Gate 3 compelling: should you side with He Who Was or show mercy? Should you keep the Dowry ring for yourself or return it to its owner? Every choice shapes your story and your party’s fate.
If you haven’t yet embarked on this epic adventure, consider picking up our Baldur’s Gate 3 Steam key. It provides instant access to Larian’s acclaimed RPG, letting you craft your legend with two mithral ores, one legendary forge and countless moral dilemmas. Select your mould, pull the lever and let the hammer fall – your fate is in your hands.
FAQs
How many items can you craft at the Adamantine Forge in BG3?
You can craft only two items at the Adamantine Forge in BG3 because there are only two mithral ore deposits near the forge. Make sure to collect all six moulds before deciding which items suit your party.
What is the best item to craft at the Adamantine Forge in BG3?
The best items to craft at the Adamantine Forge are the Adamantine Scale Mail and the Adamantine Splint Armour. Both armors provide critical hit immunity and reduce incoming damage, giving tanks and medium‑armored characters superior survivability.
Where is the Adamantine Forge located in Baldur’s Gate 3?
The Adamantine Forge is located in Grymforge, deep within the Underdark. Reach it by taking the Duergar boat from the Underdark Beach, navigating the cave‑in and platform puzzles, and descending stairs to the forge chamber near the Ancient Forge Waypoint.
How do you beat Grym at the Adamantine Forge in BG3?
To beat Grym, keep the lava flowing to make him vulnerable, lure him under the forge hammer or hit him with bludgeoning weapons while he’s superheated, and spread your party around the forge to avoid area damage. Turning the lava valve and pulling the hammer lever at the right times will help you win.
Do the Reeling effect and damage reduction stack with other bonuses?
Yes. The Reeling effect from adamantine gear stacks with other attack penalties on enemies, and the damage reduction stacks with your Armor Class. Wearing multiple pieces of adamantine gear compounds these benefits, making your character harder to hit and more resilient.