


How to Overclock RAM: A Step‑by‑Step Guide for Gamers


Tuning random access memory for better performance used to be something only hardware enthusiasts tried. Today, high-speed RAM is common in gaming rigs, and learning how to overclock RAM can be a straightforward way to squeeze extra frame rates from a well‑rounded build.
In this article, I explain what RAM overclocking is, how it works, and the safe steps I use whenever I push my memory modules beyond stock settings. Drawing on recent advice from hardware experts and my own experiences building PCs, I’ll aim to provide a practical manual on overclocking to make sure it’s accessible for newcomers.
If you want smoother data transfers in demanding games or are simply curious about memory timings, this guide will walk you through everything you need to know.
Jump to:
How to Overclock RAM – What It Means and Why Gamers Do It
Overclocking RAM refers to running your computer’s memory at higher speeds than the manufacturer’s default specification. A memory module’s speed is determined by its clock speed (measured in megahertz) and latency timings. Higher frequency means a faster data transfer rate, while lower latency means data is accessed more quickly. When you overclock RAM, you modify memory settings to achieve higher frequencies or tighter timings, often with a slight increase in memory voltage to maintain stability.
I started exploring RAM overclocking when I built my first gaming PC in college. Using DDR4 modules rated at 3200 MHz, I enabled the extreme memory profile (XMP) in the BIOS and immediately saw better performance in my favorite shooters. Overclocking the memory reduced loading times and improved system responsiveness in memory‑heavy games.
It also gave me a deeper understanding of how components such as the memory controller on the CPU and the motherboard’s BIOS work together. While the gains are sometimes modest, the combination of higher speeds and lower latency can make a noticeable difference for enthusiasts chasing every last frame.
How Ram Speed Affects System Performance
Random access memory is a bridge between the processor and long‑term storage. When you run a game or render a video, your RAM stores data that the CPU needs to access quickly. Running RAM at a higher clock speed improves the data transfer rate, letting the processor fetch information faster.
Lower latency timings reduce the wait time between each memory operation, which further improves responsiveness. This is why gamers and content creators often choose RAM kits with higher frequencies and optimized timings. A balanced combination of frequency and latency provides better performance than chasing speed alone.
What’s the Catch?
Overclocking RAM isn’t free. Pushing memory modules beyond their factory spec can increase heat output and stress the memory controller on your CPU. It may also require higher DRAM voltage, which raises the risk of system instability and potential hardware damage if pushed too far.
Laptops typically see shorter battery life when memory is overclocked. That’s why it’s vital to approach RAM tuning in small increments and verify stability after each change. If done properly, RAM overclocking is generally safe, but there is always some risk when increasing voltage beyond factory settings.
Preparing Your System Before You Overclock RAM
A successful RAM overclock begins long before you tweak frequencies. Preparation ensures that your system can handle the stress and that you have a solid point of comparison after changes.
Check Compatibility and Cooling
Not all motherboards and CPUs support RAM overclocking. The ability to adjust memory frequency and timings depends on the motherboard chipset, BIOS features, and the CPU’s memory controller. Make sure your hardware supports features like XMP or DOCP and that it has robust voltage regulation.
Gamers running Intel Core processors often look for motherboards that support AI Tweaker or Extreme Tweaker options (common on ASUS boards) because these BIOS menus provide access to memory settings. On the AMD side, boards designed for Ryzen processors offer similar advanced mode features.
Cooling is just as important. Overclocked memory generates extra heat, which can affect system stability. Ensure your case has proper airflow and that your CPU cooler isn’t already at its limit.
When I built my current rig, I upgraded from a stock cooler to a tower heatsink before touching memory settings because I saw how higher voltages could push temperatures to uncomfortable levels.
Back Up Important Data and Establish a Baseline
Overclocking can occasionally cause random reboots or data corruption if settings are pushed too far. Back up important files before you begin. Next, establish a baseline so you know how much performance you’re gaining. Tools like CPU‑Z, HWInfo, AIDA64, or the Performance tab in Task Manager let you see your current memory frequency, latency, and voltage. Run a memory benchmark or a favorite game and record the scores.
This baseline will help you quantify performance gains and catch instability early.
Choose the Right Motherboard and CPU
The motherboard determines what memory frequencies are available and how well the system handles higher voltages. Boards built with overclocking in mind often include features like BIOS flashback buttons and clear CMOS switches. They also have strong power delivery sections to support memory kits rated for high speeds.
For example, our article about the best motherboards for i9‑14900K highlights the ASUS ROG Maximus Z790 Dark Hero, which supports DDR5 speeds over 8000 MHz and includes advanced voltage controls.
If you’re building around AMD CPUs, our best AMD motherboards roundup recommends boards like the GIGABYTE X870 that are designed for overclocking and include reinforced slots and extra cooling.
Pairing your memory with a capable CPU is equally important because the memory controller resides on the processor. Newer Intel and AMD chips offer higher memory frequency ceilings and improved stability, but each platform has its own limits.
Research your CPU’s memory support before deciding how far to push your RAM. Our guide on checking CPU temp discusses temperature ranges and monitoring tools that will help you keep an eye on your processor while tuning memory.
Enabling XMP or EXPO – The Easy Route to Better RAM Performance
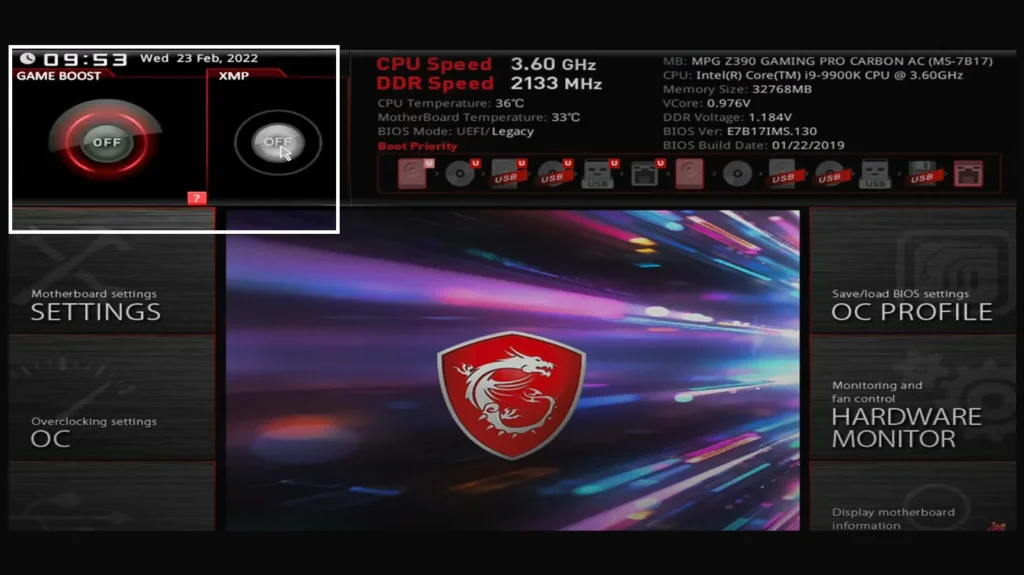
The quickest way to overclock RAM is by enabling the extreme memory profile stored in your memory modules. XMP (Intel) or EXPO (AMD’s equivalent) profiles are pre‑configured settings created by the memory module manufacturer, designed to run your RAM at higher speeds than the standard JEDEC specification. Enabling one of these profiles can provide significant performance improvements without requiring manual tweaks.
Entering the BIOS
To turn on an XMP or EXPO profile, restart your PC and enter the BIOS or UEFI interface. This usually involves pressing a key like Delete, F2, or Esc during boot-up. Once inside, navigate to the memory settings or AI Tweaker section. Each motherboard brand labels this differently—ASUS boards often have an AI Tweaker menu, MSI motherboards use Extreme Tweaker, and Gigabyte boards simply label it as Memory Settings.
Look for an option labeled XMP Profile, DOCP, or EXPO. You will typically see multiple profiles that correspond to different combinations of memory frequency, timings, and voltage. Profile 1 usually provides a conservative overclock, while Profile 2 pushes the memory closer to its rated maximum. Select a profile, save your changes, and reboot. Upon returning to the operating system, run your benchmark again to see the performance difference.
What Happens Under the Hood?
When you enable XMP/EXPO, the BIOS automatically adjusts the DRAM frequency, memory timings, and DRAM voltage to match the profile stored in the module. For example, enabling an XMP profile might set your DDR4 kit to 3200 MHz with timings of 14‑14‑14‑34 at 1.35 V.
These values are higher than the standard JEDEC settings (often 2133–2666 MHz for DDR4) and can deliver a noticeable boost in system performance.
In my experience, enabling XMP provided between a 10 % and 20 % improvement in memory bandwidth with no stability issues. It’s the best starting point for most users because the settings are tested by the memory module manufacturer.
Manual RAM Overclocking – Fine‑Tuning Frequency, Voltage, and Timings
After enabling XMP, you might still want more performance or have modules without XMP support. Manual overclocking lets you explore the limits of your memory and tailor settings to your specific build. This process involves adjusting the DRAM frequency, memory timings, and voltages incrementally to find the maximum stable configuration. Manual tuning takes patience and requires stress testing after each change to ensure system stability.
Increasing Dram Frequency in Small Increments
With XMP enabled (or after noting your baseline), enter the BIOS and locate the setting that controls DRAM frequency. Increase it in small steps, usually in 200 MHz increments for DDR4 or 100 MHz increments for DDR5, and reboot to see if the system remains stable.
For DDR5 systems on Intel’s Z690 platform, overclocking guides recommend using the Gear 2 ratio, where the memory controller operates at half the DRAM frequency. This allows higher memory speeds without overloading the memory controller. Start with a modest jump (for example, from 6400 MHz to 6600 MHz) and work your way up.
Adjusting Dram Voltage and Coarse Tuning
Higher frequencies often require more voltage to remain stable. If your system fails to boot after a frequency increase, raise the DRAM voltage slightly, about 0.01 V to 0.05 V, within the safe limits recommended by your memory module manufacturer. For DDR4, the default voltage is 1.2 V or 1.35 V for XMP profiles, and many overclockers consider 1.4 V or 1.5 V as an upper bound. DDR5 modules typically run at 1.25 V to 1.35 V for EXPO or XMP, and overclockers sometimes increase this to 1.4 V or 1.45 V. Avoid large jumps, and monitor temperatures after each change.
Manual tuning can also involve adjusting other voltages, such as the memory controller voltage (VCCIO) and system agent voltage (VCCSA) on Intel platforms, or SOC voltage on AMD platforms, to keep the memory controller stable at higher speeds. These settings affect other components and should be changed with caution.
Tightening memory timings
Memory timings describe how many clock cycles the RAM takes to perform certain operations. The primary timings, including CAS latency (tCL), tRCD (RAS‑to‑CAS delay), tRP (Row Precharge Time), and tRAS (Row Active Time), have a significant impact on performance. Lower timings (tighter timings) reduce latency but may require more voltage or a lower frequency to remain stable.
Once you’ve found a stable frequency and voltage, try tightening timings by decreasing each value one step at a time, then rebooting and running a quick stability test. If the system fails to boot, loosen the timing back to the previous stable value.
Adjusting timings is a trial‑and‑error process that can take time, but it can deliver more performance gains than frequency alone. Overclocking enthusiasts often use tools like Thaiphoon Burner to identify the memory chips (Samsung B‑die, Hynix, or Micron) used in their modules because different ICs respond differently to voltage and timings. Samsung B‑die kits, for example, are known to achieve high frequency with lower latency, while Micron E‑die modules may require higher voltages.
Balancing Frequency and Latency
Overclocking is about balancing speed and stability. Pushing frequency higher may force looser timings, which can negate some of the performance gains. Sometimes a slightly lower frequency with tighter timings delivers better overall performance.
During my own experiments with a 3600 MHz DDR4 kit, I found that running at 3600 MHz with timings of 16‑18‑18‑38 provided smoother gameplay than 3800 MHz at 20‑22‑22‑42. The improvement came from lower latency and a more stable memory controller.
Stress Testing Your Overclock

After each change, boot into your operating system and run stress tests to verify stability. Tools like MemTest86, Prime95’s Blend Test, and AIDA64 can identify memory errors and stability issues. Let these tests run for at least one to two hours or until they complete several passes without error. Monitor system temperatures and watch for random reboots or crashes. If you encounter instability, dial back the frequency, loosen the timings, or reduce the voltage. You may need to try multiple combinations before finding a balance that delivers performance improvements without sacrificing stability.
Testing and Monitoring – Ensuring Stability and Performance Gains
Overclocking RAM is mostly about ensuring the system stays stable under real‑world conditions. That means testing, monitoring, and adjusting as needed.
Benchmarking Tools and Performance Monitoring

Use benchmarking programs like AIDA64, MaxxMEM2, or PassMark to measure memory bandwidth and latency before and after overclocking. For gaming, you can also use built‑in benchmarks or record frame rates in your favorite titles. Monitoring software like HWMonitor or HWiNFO can show DRAM voltage, memory controller temperature, and other critical metrics. Keep these tools running during stress tests to watch for sudden spikes. If temperatures climb or the system throws errors, lower the voltage or frequency.
Checking CPU Temperature and Other Components
RAM overclocking can indirectly affect other hardware. Higher DRAM voltage may raise the CPU’s memory controller temperature and overall system temperature, which impacts stability and component longevity.
Make sure your CPU stays within safe ranges, typically below 85 °C during gaming or stress tests. Adjust fan curves or upgrade your cooling system if temperatures approach critical thresholds.
Recognizing Instability
Signs of instability include application crashes, blue screens, or random reboots. You may also notice graphical artifacts or audio stuttering during games. When you encounter these issues, revert to the last stable settings and try smaller adjustments. Sometimes the system will boot successfully but produce memory errors during stress testing; this indicates the overclock is close to its limit. It’s better to run slightly below the maximum stable frequency than to risk data corruption.
Risks, Drawbacks, and When Not to Overclock RAM
While overclocking RAM can provide meaningful performance improvements, there are times when it isn’t worth the effort. Understanding the drawbacks helps you decide if manual tuning is right for your system.
Potential Hardware Risks
Increasing DRAM voltage and running memory at higher frequencies increases heat and electrical stress on the memory chips and the CPU’s memory controller. Excessive voltage can shorten the lifespan of RAM modules and even damage the motherboard. Some memory manufacturers will void the warranty if damage occurs due to overclocking. Always consult your RAM’s datasheet or product page for the maximum safe voltage before proceeding.
System Instability and Data Loss
Overclocking too aggressively can cause random reboots, system freezes, or data corruption. If your system is used for mission‑critical work or you cannot risk downtime, it may be better to run memory at stock speeds or simply enable an XMP profile. Make regular backups of your data and keep a copy of your BIOS settings so you can revert to known stable configurations quickly.
Diminishing Returns and Alternative Upgrades
The performance gains from RAM overclocking vary by workload. Gaming and content creation can benefit from higher memory frequency and lower latency, but everyday tasks like browsing or word processing see little improvement. There is also a limit to how far you can push memory before other components become the bottleneck. At some point, the additional stress and time invested may not justify a small increase in frame rates.
Upgrading to newer modules with higher base speeds or larger capacity can sometimes be a better option than manual overclocking. For example, upgrading from 8 GB to 16 GB of high-speed RAM provides more noticeable improvements in modern games than increasing your existing kit’s frequency by 200 MHz.
Pro Tips for Safe and Effective RAM Overclocking
To maximize performance and minimize risk, follow these best practices:
- Make small changes. Adjust frequency, timings, and voltage in small increments. Jumping straight to high settings increases the likelihood of crashing your system.
- Prioritize cooling. Proper airflow and a quality CPU cooler help dissipate the extra heat generated by higher memory voltages. Avoid overclocking in cramped cases or dusty environments.
- Balance frequency and timings. Sometimes, a slightly lower frequency with tighter timings delivers better real‑world performance. Experiment to find the sweet spot for your hardware.
- Monitor the memory controller. Keep an eye on the CPU’s memory controller temperature. Running RAM too far above the Infinity Fabric or memory controller’s limit can cause instability, especially on AMD systems where the Infinity Fabric speed is tied to memory speed.
- Know your memory chips. Different memory chips respond differently to voltage and timings. Samsung B‑die kits often allow lower latency and higher frequency, while Micron E‑die modules may require more voltage. Tools like Thaiphoon Burner can identify the chips in your RAM modules.
- Be prepared to stop. Overclocking isn’t a competition. If you reach a configuration that provides stable performance gains without pushing voltages to uncomfortable levels, enjoy the improvement rather than chasing an extra 50 MHz.
Ready to Play?
Learning how to overclock RAM is a rewarding process that can unlock extra performance without buying new hardware. Start by understanding the basics of memory frequency and timings, prepare your system with proper cooling and backups, and enable XMP or EXPO profiles for an easy performance boost. If you’re comfortable exploring manual settings, increase the DRAM frequency in small steps, adjust voltage carefully, and tighten timings for lower latency. Always stress test after each change and monitor temperatures to protect your components.
After tuning your RAM, you’ll notice games launching faster and frame rates becoming more consistent. One way I love to test my overclocked rig is by jumping into a big open‑world game that pushes every component. Starfield is a perfect example. With a vast universe to explore and demanding system requirements, it benefits from every bit of extra memory bandwidth. You can grab Starfield (PC) Steam Key GLOBAL from our store and see how your newly overclocked memory handles space exploration. It’s a great way to enjoy the fruits of your labor while diving into one of the most anticipated RPGs of recent years.
FAQs
Is overclocking RAM safe?
Overclocking RAM is generally safe if done carefully, using small increments and keeping voltages within the limits specified by the memory module manufacturer. The key is to monitor system stability and temperatures and avoid exceeding recommended voltages. Overly aggressive settings can lead to crashes or hardware damage, so proceed cautiously and stress test after each change.
How do I overclock RAM in BIOS?
To overclock RAM in BIOS, restart your PC and press the key indicated on the boot screen, often Delete or F2, to enter the BIOS or UEFI interface. Locate the memory settings section (it may be labeled AI Tweaker, Extreme Tweaker, or simply Memory Settings) and enable an XMP, EXPO, or DOCP profile for a quick boost. For manual tuning, increase the DRAM frequency in small increments, adjust DRAM voltage as needed, and test stability after each change. Save your settings and reboot to apply them.
Does overclocking RAM increase FPS in games?
Yes, overclocking RAM can increase FPS in games, particularly in titles that are sensitive to memory bandwidth and latency. Faster memory reduces the time it takes for the CPU to access data, which can improve frame rates and reduce stuttering. However, the performance gain varies by game and may be modest compared to upgrades like a more powerful GPU.
Can I overclock RAM without XMP or EXPO profiles?
Yes, you can overclock RAM without XMP or EXPO by manually adjusting the memory frequency, timings, and voltage in BIOS. Start with your modules’ default settings and increase the DRAM frequency step by step, adding voltage only when necessary. Tighten timings carefully and test for stability. Manual overclocking requires more experimentation but allows you to fine‑tune performance beyond what pre‑set profiles offer.
Will overclocking RAM void my warranty?
It depends on the manufacturer. Some RAM and motherboard manufacturers allow XMP or EXPO overclocking under warranty, while others may void the warranty if damage occurs due to manual tuning. Check the warranty terms on your RAM kit and motherboard before overclocking. Using pre‑configured profiles generally poses less risk than manual voltage adjustments.