


How to Make a PokéStop in Pokémon GO: Build New Stops With Confidence


Creating new locations in Pokémon GO is easier than you might think once you learn how to make a PokéStop. By transforming real-world landmarks like murals, parks, and monuments into digital gathering points, you can help other Trainers explore their surroundings while earning valuable in-game rewards.
Since mid-2025, players level 35 and above have been able to submit nominations through Niantic’s Wayfarer program, expanding the world of Pokémon GO one stop at a time. In this guide, I’ll walk you through the full process of how to make a PokéStop – from finding eligible sites and taking strong photos to writing compelling descriptions and tracking your submission through approval.
Jump to:
How to Make a PokéStop in Pokémon GO: Quick Overview
To make a new PokéStop, you need to meet Niantic’s eligibility rules and follow a straightforward submission process. Here’s the high‑level checklist:
- Reach the required level and finish Wayfarer training. Niantic lowered the Wayfarer eligibility requirement from level 37 to level 35. You must complete a short onboarding quiz before you can nominate a Wayspot.
- Choose a suitable location. Eligible sites must encourage exploration, exercise, or social interaction. Historic plaques, public art, parks, libraries, and community gardens are examples of strong candidates.
- Open the in‑game submission form. In Pokémon GO, tap the menu, go to Settings, and select New PokéStop. This launches the Wayfarer form.
- Place the map pin carefully. Drag the orange pin so it sits on top of the physical object or sign you’re nominating. Avoid sites too close to existing Stops or Gyms.
- Take clear photos. Capture a well‑lit picture of the object without people, animals, or copyright‑protected material. Include an extra photo of the surroundings to show safe pedestrian access.
- Write a descriptive title and description. Use the official name of the location and briefly explain why it matters. Don’t include URLs or promotional text.
- Submit and wait. After you review your nomination, send it to Niantic’s community. Approval times vary from weeks to months, and not every accepted Wayspot becomes a PokéStop or Gym.
The rest of this guide expands on each step, offering extra context and personal tips I picked up while adding stops around my city. For battle‑oriented tasks in the game, check out our guide on defeating Arlo; it covers team-building strategies and counters in Pokémon GO.
Meeting Pokémon GO PokéStop Requirements and Eligibility Criteria
Before you head out to snap photos, ensure you meet Niantic’s rules. As of July 29, 2025, any Trainer who has reached level 35 can nominate new Wayspots. To unlock the submission form, you must finish Niantic’s Wayfarer onboarding – a brief tutorial covering criteria and good practices.
Who can submit?
To submit a PokéStop, you need:
- A Pokémon GO account at level 35 or higher.
- An adult account (child accounts cannot submit because of age restrictions).
- Completion of the Wayfarer training quiz.
- Patience – submissions can take weeks or months to process.
Eligible locations

Niantic groups Wayspots into three broad categories:
- Great places for exploration. Think historic plaques, unique art, public libraries, and community gardens. These teach players something about the area and encourage curiosity.
- Great places for exercise. Parks, nature trails, sports fields, and exercise equipment provide safe spaces to stretch your legs.
- Great places to be social. Pavilions, post offices, gaming or comic stores, fountains, and popular restaurants where people gather.
A strong candidate should be permanent, visually unique, and safely accessible on foot. When scouting, avoid private residential property, K‑12 schools, hospitals, and fire stations. Nominations too close to existing PokéStops, Gyms, or other Wayfarer candidates may be auto‑rejected.
What isn’t eligible?
Not every landmark makes a good PokéStop. Nominations may be declined if they are:
- Temporary installations (holiday decorations, seasonal markets).
- Natural features with no man‑made marker (stand‑alone trees, lakes without plaques).
- Generic businesses like big‑box stores or chain restaurants.
- Objects on private residential property or behind restricted gates.
- Locations lacking safe pedestrian access.
Take time to read Niantic’s guidelines in full via Wayfarer. Doing so will also improve your ability to review other submissions, which earns you Upgrades – these tokens push your own nominations to the front of the queue.
How to Add a PokéStop: Step‑by‑Step Guide
When you’ve identified a promising site, gather materials and plan your submission. Here’s the detailed process I follow to create PokéStops.
1. Prepare your nomination

Level up to 35 and complete the Wayfarer tutorial if you haven’t already. Log in to Pokémon GO and make sure you’re in range of the candidate. Before opening the form, take a moment to research the landmark. What is it called? Why is it significant? You’ll need this later.
2. Launch the New PokéStop form
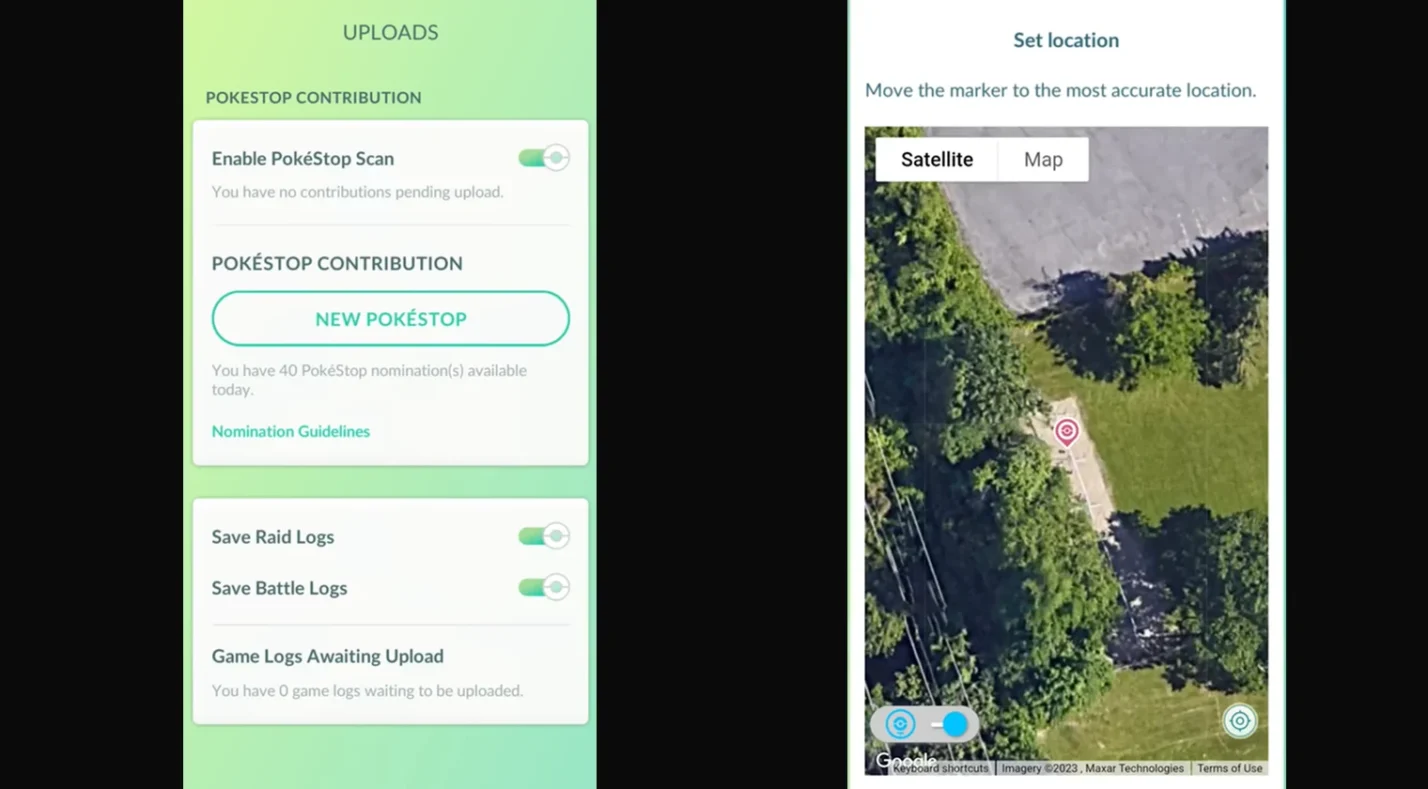
Open Pokémon GO, tap the Poké Ball icon, go to Settings, and scroll down to New PokéStop. Selecting this option opens Niantic’s submission interface. Confirm your email if prompted.
3. Place the orange pin
A map appears with an orange marker. Drag the pin directly onto the object you’re nominating. Avoid placing it on the street or offset from the actual location; Niantic uses this pin to anchor the Wayspot in the real world. If a nearby PokéStop marker shows up in blue or orange, choose another site to prevent overlapping cells.
4. Capture high‑quality photos
Your first photo should focus on the object itself – fill the frame with the mural, statue, or sign. Ensure there are no people, animals, license plates, or copyrighted art in view. Take the picture during daytime with even lighting. After the main photo, take a second picture showing the surroundings. This helps reviewers verify safe pedestrian access.
5. Compose a strong title and description
Enter the official name of the location and avoid nicknames. In the description box, briefly explain the object’s significance – what it commemorates, who created it, or why locals love it. Keep it informative and neutral; don’t include promotional text, URLs, or personal messages. If the place is part of a larger historic district or trail, mention that.
6. Select a category
Niantic may prompt you to select a category from exploration, exercise, or social. Choose the one that fits best. If the site doesn’t clearly fit any, pick other and explain its importance in the description.
7. Submit and monitor
Review your nomination details and press Submit. You’ll receive a confirmation email. Your nomination will be reviewed by Niantic’s Wayfarer community. While you wait, contribute by reviewing other submissions; once you review enough, you earn an Upgrade that accelerates one of your pending nominations.
In my first attempt, I nominated a colourful mural in a local skate park. I carefully placed the pin, took photos on a sunny morning, and wrote a description explaining the artist’s community involvement. The stop was approved within three weeks. My earlier attempt to nominate a decorative planter outside a café failed because it was too close to an existing stop – this taught me to scout with the in‑game map to avoid overlap.
If you’re eager to explore the broader Pokémon universe while your submission is pending, our breakdown of the best Pokémon games for Switch offers a journey through the series’ evolution.
PokéStop Submission Process and Review Timeline
After submitting your nomination, it enters a two‑stage evaluation. First, Niantic’s automated filters check for obvious issues like duplicates, proximity conflicts, or prohibited content. If it passes, the nomination is queued for the Wayfarer community. Reviewers rate the title, description, photos, and location using Niantic’s acceptance criteria.
A nomination must achieve a high enough rating to be accepted. Even after acceptance, only certain Wayspots become PokéStops or Gyms within Pokémon GO; some may appear exclusively in other Niantic games.
How long it takes
Patience is key. Depending on regional activity, it can take anywhere from a few days to several months for a decision. Factors influencing wait time include the number of active reviewers in your area, whether you have applied an Upgrade, and whether the nomination falls into a heavily populated cell.
Emails from Niantic will inform you when a decision is reached. If approved, the Wayspot should appear in-game within a few weeks. If rejected, read the provided reason and refine your next submission.
Tips for Creating a PokéStop and Getting Approval
Winning nominations combines attention to detail with respect for Niantic’s criteria. Here are practical tips I’ve learned after submitting multiple stops:
- Scout ahead. Use the in‑game map or Niantic’s Wayfarer website to check for existing Wayspots. Avoid sites within roughly 20 metres of another Stop or Gym.
- Research the location. Accurate names and historical context improve credibility. If there’s a plaque or sign, include its text in the description.
- Photograph like a pro. Stand squarely in front of the object, hold the phone steady, and avoid backlighting. For tall objects, take two photos – one close‑up and one showing the full structure.
- Highlight community value. Emphasise what makes the site special to locals. For example, call out that a park hosts weekly markets or that a mural commemorates a historical event.
- Review other nominations. Earning Upgrades speeds up your own submissions. Plus, you learn what makes a nomination successful by evaluating others.
- Be persistent and patient. Not every submission will be accepted. Rejections help refine your approach.
If you enjoy collecting physical Pokémon goodies as much as building in‑game landmarks, our in‑depth Pokémon card guide offers tips on choosing, valuing, and playing with cards. It’s a great companion for Trainers who love the franchise beyond the mobile game.
Differences Between PokéStops and Gyms and Choosing the Best Locations
Understanding Niantic’s mapping system helps you select the right spots to nominate. PokéStops are passive points that provide items when spun. Gyms are interactive arenas where Trainers battle and place Pokémon. Both begin life as “Wayspots” in Niantic’s database. Whether a Wayspot appears as a PokéStop or a Gym depends on its position within a grid of S2 cells. In densely populated areas, only a certain number of stops or gyms can exist in each cell, so many accepted nominations never appear in Pokémon GO.
Best locations for a new PokéStop
- Rural or underserved areas. Niantic prioritises areas with few existing stops. In small towns, a single submission can dramatically improve local gameplay.
- Historical or cultural landmarks. Museums, monuments, commemorative statues, and interpretive signs are strong candidates.
- Parks and recreation trails. Trail markers, park signs, playgrounds, and outdoor exercise equipment qualify under the exercise category.
- Community art. Murals, sculptures, and community gardens showcase local talent and encourage exploration.
Consider the cell density when nominating in urban areas. If the area already has many stops, your Wayspot may only appear in Ingress or other Niantic games. However, building a rich database benefits all titles, and Niantic occasionally upgrades stops to gyms when the cell threshold increases.
Managing Submissions: How Long Does It Take and What to Expect
The time between submission and appearance can feel unpredictable. My longest wait was nearly six months, while my fastest approval happened within five days, thanks to an Upgrade. To track your nominations:
- Use the Wayfarer website. Log in with your Niantic account to see all pending, accepted, and rejected submissions.
- Check your email. Niantic sends status updates for each nomination.
- Earn Upgrades. By reviewing other nominations, you earn Upgrades that automatically apply to your oldest pending submission. This shortens the queue time.
- Expect variance. High‑traffic regions may have longer queues. Don’t assume rejection if you haven’t heard back after a few weeks.
If your nomination is accepted but doesn’t appear in-game, remember that it may still exist in Niantic’s map. Contributing to the database helps all their games and may lead to future PokéStops or Gyms.
Bring Your Pokémon GO Adventure to Life
Learning how to make a PokéStop empowers you to enrich your community and improve gameplay for everyone. By meeting the level requirement, choosing eligible locations, and following the step‑by‑step submission process, you can transform murals, parks, and historical markers into digital waypoints. Patience and attention to detail are rewarded; even rejected nominations teach valuable lessons for next time.
While you wait for your new PokéStop to go live, why not treat yourself or a friend to some extra goodies? Our marketplace offers Google Play gift cards – use them to stock up on PokéCoins, buy expansions, or explore the many games available on Android. Level up your submissions and your inventory at the same time.
FAQs
How do you make a PokéStop in Pokémon GO?
To make a PokéStop in Pokémon GO, reach level 35, complete Niantic’s Wayfarer tutorial, and open the New PokéStop option in Settings. Place the pin on a suitable landmark, add photos and a description, and submit. Your nomination will be reviewed before appearing in-game.
What are the requirements to submit a PokéStop?
The requirements to submit a PokéStop include being level 35 or higher, having an adult account, and completing the Wayfarer onboarding. You must also nominate a permanent, publicly accessible location that fits exploration, exercise, or social categories.
Why did my PokéStop submission get rejected?
Your PokéStop submission may be rejected because the location was too close to an existing Wayspot, lacked safe access, was on private property, or didn’t meet Niantic’s eligibility criteria. Review the guidelines and improve your photos, description, and placement before resubmitting.
Can I make a PokéStop at my house?
You cannot make a PokéStop at your house because Niantic rejects nominations on private residential property. Eligible stops must be publicly accessible and safe for players to reach on foot.
How long does it take for a PokéStop to appear after submission?
It can take several weeks or even months for a PokéStop to appear after submission. Review times vary by region and queue length, but earning Wayfarer Upgrades by reviewing other nominations can speed up the process.